Showing posts with label Updated 2021. Show all posts

Wednesday, 10 February 2021

Summer Lovin


For this tutorial you will need:
A tube of choice, I am using the fantastic art of VeryMany
to use her art you will need to purchase it fromVeryManyTubes here
Summer Lovin scrapkit from Spirits & Scraps here
Mask 38 by Tonya - here


Filter Used
Xero Moonlight

Drop shadow (ds) used throughout V0, H-5, Opacity 25, blur 10
Open a blank Canvas 700 X 700
copy and paste (C&P) one of the papers as a new layer I used Myth_Paper6, apply Tonya's Mask 38, right click the mask layer, merge, merge group.

C&P  Staci Summer Loving Element 8,  resize by 65%, move slightly to the right of the canvas, right click on the layer, duplicate then go to image and Mirror, right click on the top layer, merge, merge down add a ds.

C&P Myth_Element8 or 9 as a new layer, resize by 45%, move to the left of the canvas, duplicate, mirror, right click on the top layer, merge, merge down add a ds.

Copy and paste Ladyhawwk Frame 2 , resize by 85%, 
With the frame layer active, select the rectangle selection tool and select the frame as shown below


C&P Staci's paper 6, invert the selection and delete excess paper, C&P tube close-up arrange to your liking, delete, select none add Xero Moonlight with default settings to your close-up, add a ds to the frame layer. 


C&P Ladyhawwk_Element17 or 18, resize by 85%, Move below the paper layer under the frame at the upper left side, add a ds.


C&P Ladyhawwk_Element1, resize by 50% arrange at the right side of the frame, add a ds.


C&P Myth_Element 4 or 5, resize by 10%, rotate 22 left arrange on the upper left of the frame
Add your name and copyright information. You are done!

C&P your tube, resize & arrange to your liking, duplicate, on the duplicate layer  add gaussian blur set to 2, change the blend mode of this layer to screen, drop the opacity to around 70 add a ds to the original tube layer.

Add © Info
Thank you for trying my tutorial. I hope you enjoyed it.


Proud member of Tutorial Writers Inc
Tutorial written by © Mythical
all rights reserved

Summer Heat


For this tutorial you will need:
A tube of choice, I am using the art of Keith Garvey to use this tube
you will need to purchase it from CDO here

MizTeeques Orange Melody kit which you can find here  

Font Used Blue Plate Special here

Mask 32 by Tonya's Temptations  here 


Drop Shadow used throughout H0, V4, Opacity 55, Blur 8 

Open a blank canvas 700 x 700, flood fill with white.

Copy and paste (C&P) paper 10 apply Tonya's mask, Merge, merge group

Activate the ellipse tool, Set the background colour to #ecd358, foreground to null,  draw out a circle similar to mine in the screen shot below


Right click on this layer convert to raster layer, duplicate the layer, with the original layer active go to Eyecandy 400 Gradient Glow apply with the following settings


Now with the top circle layer active add a drop shadow V-4 H4 Opacity 20 Blur 30, creating a sun effect.

C&P Element 43, resize by 70%, Image, mirror add a drop shadow (ds)

C&P Element 22, Image, flip move up slightly, resize to 90% add a ds.

C&P Element 39, add a ds

Activate the rectangle tool, Line width 6, foreground colour white background set to null, draw out a rectangle similar to mine shown below


right click on the layer convert to Raster layer, duplicate the rectangle layer.

Activate the magic wand,, click inside the Duplicate frame layer, go to Selections, Modify and expand by 2 add a new raster layer below.  C&P Paper 3 into selection, Merge Merge down add a ds.

With the magic wand repeat the step above but this time use paper 2 & do not merge the layers, keep selected, rotate  both layers, right by 12 degrees

C&P your tube as a new layer, arrange to your liking, go to Selection, Invert, with your eraser tool erase any part of the tube showing below the bottom frame, go back to Selections, select none, add a ds to the frame.

Right click on your tube layer, duplicate, on the duplicate layer, go to Adjust, Blur, Average, set the Filter Aperture to 7, change the blend mode of this layer to Soft Light.

C&P Element 40, resize to 20% add a ds, duplicate this layer move upper left, duplicate the layer, image, flip, Image mirror, duplicate again resize to 70% move to upper right and repeat 

Add your Name & Copyright Information. You are Done!


Proud member of Tutorial Writers Inc
Tutorial written by © Mythical
all rights reserved

FU


For this tutorial you will need:
A tube of choice, I am using the art of Martin Abel, to use this tube
you will need to purchase it from Creative Design Outlet here

Filters Used:
Xero Fritillary & Radience
MuRa's Meister Copies
Toadies Mosaic Blur


1.
Open a new canvas Width 340 x Height 510, Flood fill with black.
Go to selections, select all, selections, Modify and contract by 20 then back to selections, modify, select selection borders inside checked, border width 25.
add a new raster layer, choose a bright colour from your tube of choice , Merge, flood fill, selection, select none, 

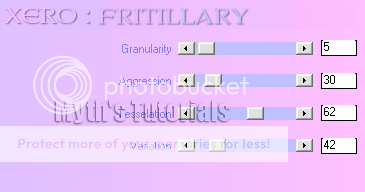
 go to Effects, plugins, Xero, Fritillary use the following settings.

image

With your magic wand, select the inside of the rectangle, go to selections, modify, expand by 2 add a new raster layer, copy & Paste your tube, resize if needed, Apply MuRa's Meister Copies, select wallpaper from the drop down menu and apply with default settings
apply Toadies Plain mosaic blur with default settings, change the blend mode of this layer to hard light then go to adjust, brightness and contrast, change brightness to 25, contrast 0, apply, selections, select none, move this layer below the frame layer,

Open another canvas Width 135 x Height 450, Flood fill with black. 
Go to selections, select all, selections, Modify and contract by 10 this time then back to selections, modify, select selection borders inside checked, border width 15.

add a new raster layer,  flood fill with white, selection, select none,
Click inside this frame with the magic wand, flood fill with another colour that matches your tube 
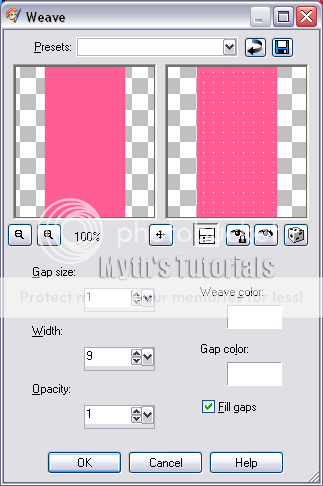
go to Effects, texture effects, weave add the following settings,

image

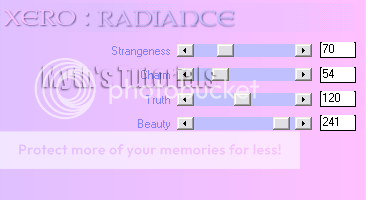
then go to selections, select all, selections float, selections de float, copy and paste your tube, resize and position to your liking, go to selections, invert hit delete on your keyboard, Selections, select none, duplicate the tube, on the original add xero radiance with the following settings, change the blend mode to Luminance legacy

image

On the duplicate layer go to Adjust, Blur, average set the Filter aperture to 9, change the blend mode of this layer to Soft Light, Move the frame layer above the tube layers.

open a new canvas 700 x 700

on the first tag we made copy merged & paste as a new layer onto the new canvas, add a drop shadow H3 V -3, opacity 36, blur 6.
Copy merged and paste the second tag we mage as a new layer, position to the side the duplicate & mirror 

So it should now look like the screen shot below


Select the rectangle tool, set the background colour to black the foreground to null and draw out a rectangle as directed below


Right click on the layer in the layer palette, convert to raster layer.
Go to selections, float, selections defloat then selections again, modify contact by 10.
add a new layer, flood fill with the colour you used on the smaller frames background, apply the 
Xero Fritillary as before, selections, select none, right click on this layer, merge, merge down, drag this layer to the bottom

Add your name. I used bank Gothic, black but changed the kerning to 350. Add copyright info. You are Done!


Proud member of Tutorial Writers Inc

Tutorial written by © Mythical
all rights reserved

Hold Me


For this tutorial you will need 

A tube of choice I am us
ing the art work of VeryMany you can purchase it at VeryManyTubes Here
Brush by Agi. agi brush 46 can be downloaded from deviant art site Here
Mask WSL_Mask113 by Chelle you can download it here
Frame & Flowers Here

Filter
VDL Unplugged-X Here

Open a blank canvas 700  x  700, flood fill with white.

New raster Layer, flood fill with black (or a colour to match your tube), apply WSL_Mask113 , right click on the mask layer, merge, merge group,

Open a new canvas 400  x  400 we will call this C2, activate the Black-White gradient (or one to match your tube if you want to make it colourful) Angle 45 Repeats 3 ,  flood fill the canvas, go to VanDerLee UnPlugged-X select Distortion, repeat Edges Deviation 36, apply, add a new raster layer, flood fill with black, select all, modify, contract by 4, hit delete on your keyboard, select none Copy merged & paste onto the first canvas, free rotate by 15 right, add the following Drop shadow, V4, H-4, Opacity 66, Blur 12, colour black (I used this drop shadow throughout).

Back to C2 on the distortion layer back to VDL Uplugged and select Copystar, change amount to 10, apply, Copy merged and Repeat but change the rotation direction left, you can close C2 now we are done with it.

Copy and paste the frame as a new layer, with the magic wand, click inside the frame and expand by 2 pixels, add a new raster layer below and flood fill with the gradient but change the repeats to 0, copy and paste your tube of choice as a new layer below the frame layer position to your liking, invert, delete, change the blend mode of this layer to luminance, add a drop shadow to the frame. 

Hide the white background layer and merge visible.  Move everything down toward the bottom of the canvas to give room for the wordart. Unhide layer.

New raster layer. Find the agibrush and apply to the top of the tag. 

  Add any copyright information.  You are done!


Proud member of Tutorial Writers Inc

Tutorial written by © Mythical

all rights reserved 

Feeling Lucky


You will need:
Tube of choice, I used the art work of Keith garvey, to use this tube you need to
purchase a licence from CDO 
Here
My Mask. Just right click and save as  Here
Feeling Lucky scrap kit by Scrappy Bit of Fun it's FTU you can get it Here
and Simons animation Ani289Medium Here


Eye candy Gradient Glow (optional)


Open a blank canvas 700 x 700, flood fill with white

Add a new raster layer, select all
Copy and paste a paper 5 into selection and apply the mask 424, right click the mask layer, merge, merge group.

Copy and paste one of the light coloured flowers as a new layer, move slightly to the left, duplicate & mirror,  right click the top flower layer, merge, merge down. Add the following drop shadow:  H -3, V 3, Opacity 66, blur 12, colour black.

Copy and paste element 35 as a new layer, arrange at the bottom right of the larger flowers, add the same drop shadow, 

Copy and paste element 33 as a new layer, add a drop shadow with the same settings as earlier.


Copy and paste Element 31 as a new layer

Copy and paste element 18 as a new layer, Image, resize by 30%  arrange to look like its hanging from the corner of the lucky horse shoe ( see my tag for reference).  Activate the lasso tool. Point to point, Feather 1, smoothing 0. Draw around the corner of the shoe. Make sure the element 18 layer is active and hit delete on your keyboard. see the screen shot below.


Copy & Paste your tube of choice as a new layer, resize to your liking

add a drop shadow

Copy and paste one of the pots of gold as a new layer, resize to 35%, use the same settings as earlier add a drop shadow with the same setting as before.

Add your name & copyright info

Now for the Animation

Go to edit Copy merged

In Animation Shop, Edit paste as a new Animation
Hold down the Ctrl button on your keyboard and hit the L character 
another 19 times


you should have 20 layers in total.
On Simon's animation go to edit, select all, edit gain & copy
Make your animation active.
Hold down the Ctrl button And press the E character Place animation 
On top of the pot of gold.

Edit Save.


Proud member of Tutorial Writers Inc

Tutorial written by © Mythical
all rights reserved