

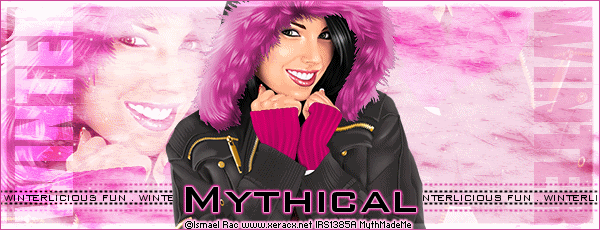
For this tutorial you will need:
A tube of choice, I am using the art of Zalta_M
to use this tube you will need to purchase it from PDF Here
VanDerLee Snowflakes filter Here
Texture Pack #109 by Sanami276 at DevientArt here
1.
Open a blank canvas 675 x 275, flood fill with white.
Add anew raster layer, Go to selections, select all
Copy & paste one of the textures from the pack #109,
I used Texture 30 into selection. colourise to compliment your tube
2.
Copy and paste your tube as a new layer, arrange to your liking, duplicate the layer, go to image & mirror arrange as desired, right click the layer, merge, merge down, change the blend mode to screen or soft light which ever looks better.
3.
Activate the pen tool, choose draw lines and polylines, line style dots, Width 2, anti alias checked, colour black, holding shift draw a line across the tag, right click the layer, convert to Raster layer.
4.
Repeat step 3 but change the colour to one that compliments your tube, place the two lines close to each other, merge the two lines together, duplicate, go to image, flip arrange close to the other lines leaving a gap for your words (see my tag for reference)
5.
Activate the text tool choose a pixel font, I used Bank Gothic Condensed size 8, colour black in caps type out Winterlicious fun or words of your choice, right click the layer convert to raster layer.
6.
Change the font to a thick font, I used Impact size 55, change the colour to white or a very light colour from your tube type out winter in caps, go to, image, rotate, free rotate and rotate 90 degrees left, arrange to the side of the tag leaving a small gap all around, convert to raster layer, add a drop shadow I used V&H 1, Opacity 53, blur 1. Change the blend mode of the layer to soft light, multiply or overlay which ever looks best.
7.
Repeat step 6 but rotate 90 degrees right.
8.
Go to layers, merge, merge visible then selections, select all, modify, select selection borders, inside, border width 6.
9.
Go to Adjust, brightness and contrast, brightness/contrast, change the brightness to 50, contrast 0, selections, select none
10.
Copy and paste your tube of choice as a new layer, resize if needed, arrange to your liking, Duplicate change blend mode to one you like (Optional) add a drop shadow to the bottom tube layer H 3 V -3 Opacity 20 blur 6, select the crop tool, snap crop rectangle to merged Opaque, apply the repeat step 9 on your tube layer.
11.
Add a new raster layer, move to the top,
flood fill with a colour that compliments your tube, go to selections
select all, modify, contract by 1 pixel then hit delete on your keyboard
Add your name & copyright info.
If you are not animating you are done.
Animation
1.
Duplicate the bottom merged layer 2 times for a total of 3 layers, rename the layers 1,2 & 3
2.
Make layer 1 active apply VanDerLee Snowflakes with the following settings.

3.
Apply VanDerLee snowflakes to layers 2 & 3 with the same settings but change the random seed each time. Hide layers 2 & 3
4.
Open Animation shop(AS), In Paint Shop(PS) go to edit, copy merged over in AS go to edit and paste as new animation
5.
In PS hide layer 1, unhide layer 2, go to edit, copy merged over in AS go to edit and paste after current frame.
6.
In PS hide layer 2, unhide layer 3, go to edit, copy merged over in AS go to edit and paste after current frame. Save Tag
Avatar
1.
Open a blank canvas 180 x 180 copy and paste layer 3 from your tag as a new layer, arrange to your liking, copy and paste your tube as a new layer, arrange to your liking, merge visible.
2.
select the crop tool, snap crop rectangle to merged Opaque, apply
3.
Repeat step 9, add your name and copyright Information
Your Done!
![]()
Proud member of Tutorial Writers Inc
Tutorial written by © Mythical
all rights reserved
No comments:
Post a Comment