Showing posts with label PTU Tutorials. Show all posts

Monday, 29 August 2022

It's Halloween


For this tutorial you will need:

A tube of choice, I am using the art of Very Many
to use this tube you will need to purchase it from Very Many Tubes HERE

The beautifully spooky It's Halloween kit
by Pammyyy's Perfections from the following stores
https://elegancefly.com/
http://allthatglitterzstore.com/
http://scrapsncompany.com/
https://www.secretgardendesigns.shop/
Please check out the rest of Pammyyy's kits they are fab
Lori's Mask LLM_663 HERE

Filters Used
MuRa's Meister - Copies
Xero Radience (Optional)

Drop shadow used throughout V 0,  H-4, opacity 40, Blur 10


Lets Begin

Open a blank canvas 700 x 700, flood fill with white.

Add a new raster layer, selections, select all, Copy & Paste (C&P) Paper 5 into selection, selections, select none.

Apply Lori's mask LLM_663, Merge, Merge group.

C&P Element 48 as a new layer, resize by 25%, Add MuRa's Meister Copies, Set the Number to 10, Set Shift Y and Shift X to 60, apply. Add a drop shadow (DS)

C&P Element 49 as a new layer, resize by 25%, Add MuRa's Meister Copies, Set the Number to 14, Set Shift Y and Shift X to 55, apply. Add a drop shadow (DS)

C&P Element 76 as a new layer, Resize by 60% arrange on the right side, add a DS

C&P Frame 3 as a new layer, Resize by 45%, with the magic wand click in the centre, selections, modify, expand by 2, add a new raster layer and move this layer below the frame, change the foreground colour to #d66115 and the background colour to #962abf select the foreground background gradient, angle 45, repeats 0, flood fill the selection *foot note  

C&P your tube close up. resize as needed, arrange to your liking, selections, invert then hit delete, selections, select none. 

Hide all the layers except the frame, gradient and tube layer, merge, merge visible, unhide the layers, Adjust the Hue/Saturation/lightness with the following settings


free rotate the frame 25 degree left add a DS.

C&P Element 50, resize by 25% Duplicate, mirror and arrange at the left bottom of the frame, add a DS to both layers.

C&P Element 75, resize by 50% Duplicate, arrange at the left of the frame, add a DS, move this layer below the flower layer, add a DS.

C&P Element 48, resize by 30% Duplicate, arrange at the left of the frame, add a DS.

C&P Element 23, resize by 40% Duplicate, arrange at the bottom of the frame, add a DS

C&P Element 60, resize by 30% Duplicate, arrange at the left of the frame. see my tag for reference, add a DS

C&P your tube of choice as a new layer, Resize and arrange to your liking. Optional. duplicate the tube layer, on the duplicate layer add Xero Radiance with the following settings


Change the Blend mode of this layer to Screen or Soft light which ever looks best. add a DS to the original tube layer.

C&P Element 73, resize by 315% arrange in front of your tube, add a DS

Add your name and Copyright info. Thank you for trying out my tutorial

*I did not have the Foreground background gradient in PSP 2020 I found it online if you need it you can download it HERE


Friday, 22 July 2022

Summer's End


Summer's End in the Country Kit by Pammyyy's Perfections


For this Tutorial you will need:

A tube of choice, I am using the art of Alex_Prihodko you can purchase this tube from PFD Here
The stunning Summer's End kit by Pammyyy's Perfections full of awesome summer's End in the Country elements, great for all your tagging needs, please check put the rest of her kits at the following stores 

Lori's Mask 663 Here


Drop Shadow Used Throughout V 0, H -5, opacity 35, blur 8.

Open a blank canvas 750 x 750, flood fill with white, selections, select all
Open paper 1 Copy & Paste (C&P) into selection, de select, apply Lori's Mask 663, merge, merge group, duplicate this layer, layers Mirror, it should look like the screen shot below.

Be careful to ensure none of the mask layer is out side the canvas edges.

Open Frame 2, C&P as a new layer, resize by 75%, activate the magic wand, click in the centre of the frame, selections, expand by 3, add a new raster layer, open paper 10, C&P into selection, de select, add a Drop Shadow (DS)

Open Element (E) 35, C&P as a new layer, resize by 50%, arrange on the right, add a drop shadow, duplicate, mirror arrange on the left.

Open E33 C&P as a new layer, resize by 65%, image, free rotate 8 degree right, arrange at the top of the frame, add a DS.

Open E38 C&P as a new layer, resize by 30%, add a DS, arrange on the left of the frame.

Open E29 C&P as a new layer, resize by 30%, add a DS, arrange on the floor in front of the frame.

Open E54 C&P as a new layer, resize by 35%, add a DS, arrange on the left corner of the frame.

Open E55 C&P as a new layer, resize by 35%, add a DS, arrange on the right of the frame.

Open E7 C&P as a new layer, resize by 10%, add a DS, arrange to your liking.

Open E6 C&P as a new layer, resize by 30%, Add a DS, arrange on the left of the frame.

Open E11 C&P as a new layer, resize by 10%, add a DS, arrange on the left as if it has landed on the lamp.

C&P your tube as a new layer, resize & arrange to your liking.
Hide the white bg layer, 

Open E38 C&P as a new layer, resize by 30%, add a DS, arrange on the left of the frame.
Add your name & copyright information, Thank you for trying out my tutorial


Thursday, 14 July 2022

Dark Magic


For this tutorial you will need:
A tube of choice, I am using the art of Attila to use this tube you will need to purchase it from EleganceFly Here
A beautiful Scrap kit called Dark Magic by Pammyyy's Perfections Here
Check out the rest of her amazing kits at the following stores
Mask 2 by Suz  from the Creative Misfits Creations Blog Here

Filters Used
MuRa's Meister Copies
Eye Candy Gradient Glow Optional
Xero Radiance Optional

Drop shadow (DS) used throughout V -4, H4, opacity 35, blur 12 

Open a new canvas 750 x 750, flood fill with white.

Add a new raster layer, select all, open paper 3 copy & paste (C&P from here) into selection, deselect.

Open the mask in Paint Shop then go to layer, new mask layer, from image, select Suz bcamask2 from the drop down menu and apply, duplicate this layer then resize the duplicate layer by 95%.

Open element 28 C&P as a new layer, resize by 25%.

Add muRa's Meister Copies change Number to 12,  Shift X to 60 Shift Y to 76and apply, add a DS .

Open Element 33, C&P as a new layer, resize by 35%, free rotate by 45 degrees right arrange top right see my tag for reference, add a DS.

Open element 27, C&P as a new layer, resize by 10%.

Add muRa's Meister Copies change Number to 21,  Shift X to 55 Shift Y to 70, apply, add a DS .

Repeat the above step with Element 64. 

Repeat again with Element 66 but change the Shift X 50 to & Shift Y to 67.

Open Element 13 C&P as a new layer, resize by 35% repeat the copies plugin settings but change the number to 24.

Open Frame 4, resize by 60% add a DS

C&P your tube of choice, resize and arrange as desired, Add a DS 

Optional: With my tube I duplicate, on the duplicate layer I adjust the blur, Gaussian blur by 2 then add xero radiance with the following settings 

Change the blend mode of this layer to Soft light, 

Open Element 17, resize by 50% and arrange so it is behind your tube layer.

C&P Element 26 as a new layer, resize by 20%, arrange on the bottom left, add a DS.

C&P Element 45 as a new layer, resize by 30%, arrange on the bottom centre, add a DS.

C&P Element 19 as a new layer, arrange on the bottom right,
Optional: add a gradient Glow, Glow width 10, color, thin #c8b4cd

C&P Element 62 as a new layer, resize by 15%, arrange next to the globe, add a DS, duplicate this layer, mirror and arrange at the bottom of the spell book.

C&P Element 18 as a new layer, resize by 17%, arrange near the flower & spell book, add a DS.

C&P Element 15 as a new layer, resize by 17%, arrange in front of the crystals, add a DS.

C&P Element 64 as a new layer, resize by 20%, arrange in front of the candle stick, add a DS, duplicate this layer, mirror, arrange by the crystals

C&P Element 9 as a new layer, Resize by 20%, arrange on the right, add a DS

C&P Element 59 as a new layer, resize by 13%, arrange on the right, add a DS.

C&P Element 60 as a new layer, resize by 15%, arrange on the in front of the bottle, add a DS.

C&P Element 61 as a new layer, resize by 50%, arrange on the bottom right, add a DS.

C&P Element 3 as a new layer, resize by 25%, arrange on the bottom left, add a DS.

Add your name & copyright information, Thank you trying out this tutorial.


Wednesday, 10 February 2021

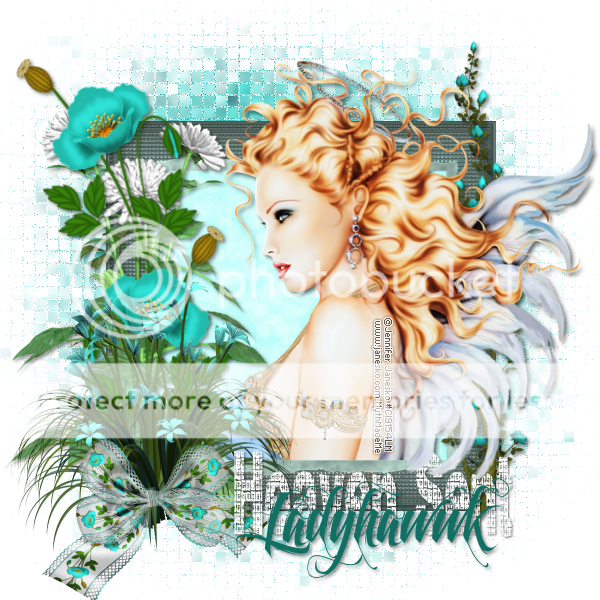
Heaven Sent

 image


For this tutorial you will need:
Tube of choice, I am using the art of Jennifer Janesko
to use this tube you will need to purchase it from The Creative Design Outlet here
The Beautiful PTU kit called Simply Teal by LHD Scraps
You can purchase the kit at the Creative Design Outlet here 
Myth mask 5 here

Fonts used Feathergraphy2 - Plaid


Drop shadow used throughout - H&V 2, opacity 45, Blur 5, colour black.

Open a blank canvas 600 x 600, flood fill with white,

Copy and paste a paper of choice as a new layer, I used paper5, go to layers, load/Save mask, Load mask from Disk choose Myth mask 5 from the dropdown menu, right click on the mask layer, merge, merge group.

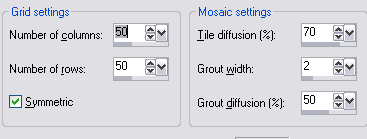
Go to Effects, Texture Effects, Mosaic Antique apply with the following settings

image

Copy and paste frame 2 as a new layer with the magic wand click in the center of the frame, go to selection, Modify, Expand by 5 pixels, copy and paste a paper of choice as a new layer, I used paper15, back to selection invert then hit delete on your keyboard, selections, select none, drag this layer below the frame layer.

Copy and paste Element35 as a new layer, go to image, resize and resize by 80%, resample using Smart Size, resize all layers unchecked, arrange on the left hand side of the frame, add a drop shadow.

Copy and paste Element 8 as a new layer, go to image, resize and resize by 85%, go back to image, rotate, free rotate 20 degrees right, all layers unchecked, then back to Image, mirror add a drop shado, arrange on the left of the frame.

Copy and paste Element 33 as a new layer, go to image, resize and resize by 50%, arrange on the left of the frame. 

Copy and paste Element 6 as a new layer, go to image, resize and resize by 40%, move to the bottom left of the frame to look as though it is holding the flowers together.

Copy and paste Element 29 as a new layer, go to image, resize and resize by 65%, arrange on the right hand side of the frame. add a drop shadow.

Copy and paste your tube of choice as a new layer, go to Layers, duplicate, move the duplicate layer below the frame layer, with the orignal layer active erase any parts hiding the flowers on the frame, then erase any part of the tube showing below the frame on both tube layers. add a drop shadow to the duplicate tube layer.

Add your name & copyright information. your Done!


Proud member of Tutorial Writers Inc
Tutorial written by © Mythical
all rights reserved

Tuesday, 19 April 2016

Soft Touch


For this tutorial you will need:
The stunning scrap kit called Soft Touch from LHD scraps here
My Mask MD_22 here
A tube of choice, I am using the art of Jennifer Janesko, to use this
tube you will need to purchase it from the Creative Design Outlet here


Load the mask into your mask folder.
Open a blank canvas 600 x 600, flood fill with white.

Add a new raster layer, go to selection, select all, Open Paper5 copy and paste into selection back to selections, select none.

Go to layers, load/save mask, load mask from disk and select mask MD_22 from the drop down menu, apply with the following settings, create mask from source luminance, orientation fit to layer options hide all mask, go back to layers, merge, merge group.

Open Ele19, copy and paste as a new layer onto your canvas.

Open Frame2, copy and paste as a new layer onto your canvas, go to image, resize and resize by 70%, smart size, resize all layers unchecked, go to layers, properties, rename this layer FRAME.

select the lasso tool, selection type set to point to point, mode set to add(shift) and feather set at 0, draw round the frame as shown in the screen shot below


add a new raster layer, Open paper11 copy and paste into selection, go to selections, select none, drag this layer below the FRAME layer.

copy and paste your tube as a new layer, arrange to your liking, go to layers, properties, rename this layer TUBE, then go to image, duplicate, drag the copy of TUBE layer above the FRAME layer.

Make the copy of TUBE layer active by clicking on it in the layers palette, Select the eraser tool and erase any part of the tube below the bottom half of the frame, then repeate with the TUBE layer active.

Now with the FRAME layer active, open Ele35, copy and paste as a new layer, go to image, resize and resize by 80%.

Open Ele24, copy and paste as a new layer onto your canvas, go to image, resize and resize by 35%, arrange at the top corner of the frame, go to effects, 3D effects, drop shadow add a drop shadow with the following settings, H 5, V -4, Opacity 45, blur 6, color black, add the same drop shadow to the FRAME & TUBE layers.

Add your name and copyright info, delete the white background layer and resize if desired. your done!

Sunday, 17 April 2016

Pretty lil Bee


For this tutorial you will need:


The beautiful scrap kit used Blossom to the Bee by Miggins here
MCmask 02\by Kaci from the creative Misfits blog here
Mask MD_21 from my blog here
The tube I have used is FTU by Lia here
please read her TOU here


Put both masks into your mask folder
Open a blank canvas 600 x 600, flood fill with white.

new layer, Go to selections, select all
Open Paper24, go to edit, paste and paste into selection then back to selections, selct none.
Go to layers load/save mask, load mask from disk, in the drop down menu select MC-Mask 02, apply with the following settings, Create from source luminance checked, fit to layer checked and hide all mask checked, go to layers, merge, merge group.

Open paper15 and apply with the same setting, then merge, merge group, go to layers, duplicate, with the duplicate layer active go to image, rotate, free rotate 22% Left, rotate all layers unchecked, then back to image, resize by 110% resample using smart size checked, resize all layers unchecked.

Open element 3, copy and paste as a new image onto your canvas, go to image, resize and resize by 25% same settings as before, we will use these settings throughout this tutorial.

Open element62, copy and paste onto your canvas,go to image, resize and resize by 40%, with your lasso tool, with the following settings, Selection type point to point, mode add(shift) feather 0, trace around the circle using the outer circle as we are going to fill the back ground, open paper, go to image, resize and resize by 10%, copy and paste onto your canvas, then go to selections, invert, then hit delete on your keyboard, then back to selections, select none, move this layer below elements 62 layer.

Make the top layer active by clicking on it, Open element 69, copy and paste as a new layer onto your canvas, go to image, resize and resize by 15% then go back to image and mirror, arrange the tree at the right hand side of the circle to your liking, go to effects, 3D effects, add the following drop shadow 4, -4, 56, 8.

Open your tube of choice, resize and position to your liking then go layers, duplicate, on the duplicate layer change the blend mode to screen, on the original layer add the same drop shadow as used on the tree.

Open elements 66, 67 or 68, copy and paste onto your canvas, go to image, resize and resize by 15%, arrange to your liking, then add a drop shadow the same settings.

Open element74, copy and paste onto your canvas, go to image, resize and resize by 20% arrange at the base of the tree, add a drop shadow settings as before.

Add your name and copyright info. If you have used the tube supplied it is 

©Lia www.Linmida.com . delete the bottom white layer and resize if needed. your done!

Thursday, 24 September 2015

Hocus Pocus

HPocus_Ladyhawwk


For this tutorial you will need a tube of choice.
I am using the art of VeryMany Tubes, to use this tube,
you will needto purchse it from the VeryManyTubes store here
Ladyhawwk Designs part of the CDO Collab kit, its amazing!
Masks 19 & 24 by me here & here
Muras Meister Copies

Drop shadow used through out H 6, V -6, opacity 55, blur 8, color black.

Open a blank canvas 600 x 600, flood fill with white.
Open Ele 21, copy and paste onto your canvas as a new layer, go to layers, properties and rename this layer Mask1.

Go to effects, plugins, Muras Meister Copies, select wallpaper from the drop down menu and apply with default settings, add a new raster layer, go to selections, select all, make the mask 1 layer active, go to selections, invert, then hit delete on your keyboard, go back to selections, select none.

Delete the top blank layer.

Go to layers, load/save mask, load mask from disk, select MD_14_19 from the drop down menu, source luminance checked, fit to canvas checked, hide all mask checked, load. Then go to layers, merge, merge group.

Go to image, resize and resize by 110%, resample using smart size, resize all layers unchecked.

Add a new raster layer, go to selections, select all, Open Paper 3, copy and paste as into selection then back to selections, select none, go to layers, load/save mask, load mask from disk, select MD_14_24 from the drop down menu, same settings as before , apply, then go to image, resize and resize by 85% using the same settings, then layers, merge, merge group.

Open Ele 9, copy and paste as a new layer onto your canvas.

Open Ele18, copy and paste as a new layer onto your canvas, go to image, resize and resize by 80%.

Open Ele 17 copy and paste as a new layer, go to image, resize and resize by 60%, position at the bottom left of the grave stone. add a drop shadow.

Open Ele 15 copy and paste as a new layer, go to image, resize and resize by 75%, position accross the grave stone. add a drop shadow.

Open your tube of choice, resize and arrange to your liking, go to layer, duplicate, then dupliate again, on the first duplicate layer go to adjust, blur, Gaussian blur set the radius to 1, on the top duplicate tube change the blend mode of the layer to screen or soft light whichever suits your tube best. back to the original layer add a drop shadow.

With your top layer active, open Ele 6, copy and paste as a new layer onto your canvas, go to image, resize and resize by 40%, position to your liking, add a drop shadow.

resize you image if needed, delete the bottom white layer, add a name and the copyright info. your done!

Saturday, 13 June 2015

Friendship Blooms


For this tutorial you will need:
A tube of choice, I am using the art of Very many, to use this tube 
you will need to purchase it from VeryManyTubes here
An absolutely stunning PTU kit called Beautiful Blooms by Ladyhawwk Designs here
My masks here & here


Put the two masks into your mask folder.

Open a blank canvas 700 x 600

Open Pape13, copy and paste as a new layer onto the canvas,go to layers, load/save mask, load mask from disk, select MD_14_09 from the drop down menu and apply with the following settings, source luminance checked, fit to layer canvas checked, hide all mask checked then go to layers, merge and merge group then go to image, resize and resize by 120%, smart size, resize all layers unchecked.

Repeat the above step using paper11, mask MD_14_16 but do not resize.

Open Ele 8, copy and paste as a new layer onto the canvas.

Open Ele 25, copy and paste as a new layer, go to resize and resize by 87% using the same settings,

Open frame 3, copy and paste as a new layer, go to resize and resize by 65%, same settings, activate the rectangle selection tool, feather set to 0, draw out a selection similar to the one in the screen shot below, open paper 3,copy and paste as a new layer then go to selections, invert then hit delete on your keyboard then back to selections, select none. Drag this layer below the frame layer.


Make the frame layer active add the following drop shadow H-3, V3, opacity 55, blur 6, color black, use these settings throughout the tutorial.

Activate the magic wand, tolerance and feather both set to 0, click inside the center of the small frame, copy and paste your tube as a new layer, resize and arrange to your liking, go to selections, invert, then hit delete on your keyboard, then back to selections, select none, change the blend mode of this layer to luminance.

Open Ele 31, copy and paste as a new layer,go to layers, resize and resize by 45%, arrange at the base of the frame to your liking.

copy and paste your tube as a new layer, resize and arrange as far right to the frame as you can leaving enough room in the frame for your text, duplicate the tube layer and change the blend mode of the duplicate layer to screen or soft light which ever you like best, add a drop shadow to the original tube layer.

Open element 23, copy and paste as a new layer, go to image, resize and resize by 30% arrange at the bottom left of the frame, add a drop shadoew, then go to layers, duplicate, then image and mirror arrange at the side of the other flower.

active the text tool, select a font you like, click on the paper inside the frame and type " Friendship is like a flower that blooms  grows" or anything you prefer, apple, go to layers, convert to raster layers, i added the same drop shadow but changed the H to -1 & V 1.

Add your name and copyright info, resize your tag if required. your done! 


Tuesday, 9 June 2015

Under The Sea


For this tutorial you will need:
A tube of choice, I am using the art of Alex Prihodko, to use this tube you will need to purchase it from pics for designs here
The beautiful  IB Anna Liwanag 2015 kit by Ladyhawwk here
Mask 06 & 19 by me here & here


Put the masks into your mask folder.

Open a blank canvas, 600 x 600, flood fill with white.

Go to Layers, new raster layer,  selections, select all, copy and paste Paper 1 into selection

Go to layers load/save mask, load mask from disk, choose MD_14-19 from the drop down menu, apply with the following settings, source luminance checked, fit to canvas checked, hide all mask checked,

Go to image, resize and resize by 103 %, resample using smart size, resize all layers unchecked.

Repeat the last step but using mask MD_14_06.

Open Ele 18, copy and paste as a new layer, go to resize and resize by 78% using same settings as before.

Open frame 1, copy and paste as a new layer, go to resize and resize by 40%,  activate the magic want, tolerance and feather both set to 0, click inside the frame, go to selections, modify and modify by 5 pixels,

Open paper 4, copy and paste as a new layer on to your canvas, move this layer below the frame layer, keep selected copy and paste your tube or close up of choice, arrange to your liking, then go to selections, invert, then hit delete on your keyboard, activate the paper 4 layer and hit delete again, go to selections, select none.

With the tube layer active, lower the opacity of this layer to around 72, then go to layer, duplicate on the duplicate layer change the blend mode to screen or soft light which ever compliments your tube, on the original tube layer, go to adjust, blur, gaussian blur, set radius to 3 and appl, go to effects, drop shadow and add the following drop shadow to this layer, H4, V-4, opacity 45 blur 8 and color black.

Add the same drop shadow to the frame layer.

Open Ele 11, copy and paste as a new layer.

Open Ele 4, copy and paste as a new layer on to your canvas, go to image, resize, resize by 45%, add a drop shadow (the same drop shadow settings are used throughout) arrange at the bottom right of the frame.

Open Ele 27, go to image, resize and resize by 60% add a drop shadow, arrange at the bottom right of the frame.

Copy and paste your tube as a new layer, resize and arrange to your liking, one happy duplicate this layer, change the duplicate tube layer mode to screen or soft light which ever you prefer, then add a drop shadow the original layer.

Open Ele 8, go to image, resize and resize by 30%, add a drop shadow, arrange at the bottom right of the frame.

Addyour name and copyright info, delete the white background layer and resize if required. Your done!


Tuesday, 24 February 2015

Inner Beauty

IB-_LHD


For this tutorial you will need:
A tube of choice, I am using the art of Verymany to use this tube
you will need to purchase it from VeryMany Tubes here.
The sunning kit called Inner Beauty by the very talented LHD Scraps here
Masks 75 & 80 By Millies PSP Madness here
My Mask MD_14_18 here

Put the masks into your mask folder.

Open a blank canvas 600 x 600,flood fill with black (this lyer will be deleted at the end, its just for visual guidance)

*Open Paper9 go to edit, copy, paste as a new layer onto the canvas, go to layers, load/save mask load mask from disk, scroll down and find MD_14_18 apply with the following settings, source luminance checked, fit to canvas checked, hide all mask checked, then go to layers, merge, merge group.

 Add a new raster layer.
Open Ele35. got to edit, copy and paste onto the canvas, copy and paste onto the canvas, go to image, resize and resize by 80% with the following settings, resample using smart size, resize all layers unchecked.. move to the left hand side making sure none of the element is touching the sides of the canvas, then go to layers, duplicate,then go to image, mirror back to image and flip then go to layers, merge, merge down.

Repeat the* step above for the next mask layer  using Paper1 and MPM mask 80.

Open Frame2, copy and paste onto the canvas, go to image, resize and resize by 60% same settings as before, o to effects, 3D effects, drop shadow, add the following drop shadow H10, V-10, Opacity 45, Blur 5, color black. (these settings are used throughout)

Select the magic wand,tolerance 20, feather 0, mode add or replace, click in the center of the frame thn goto selections, modify, expand by 5 pixels, open paper9 again copy and paste onto the canvas, then go to selections invert, then hit delete on your keyboard, copy and paste your tube, position to your liking in the frame then when happy hit delete again on your keyboard, go to selections, select none. 

on the tube layer change the blend mode of this layer to Luminance with the tube layer still active go to layers, duplicate,change the blend layer to screen, make the frame layer active go to layers, arrange, move to top.

Open Ele41, copy and paste onto the canvas, go image, resize and resize by 70%,arrange on the left of the frame, add a drop shadow

Open Ele8, copy and paste as a new layer onto the canvas, go to image, resize and resize by 50%, arrange at the top left of the frame, add a drop shadow.

Copy and paste your tube of choice onto the canvas, resize and arrange to your liking, then go to image, duplicate, on the duplicate layer change the blend mode to screen or soft light whichever you prefer, on the original tube layer add a drop shadow.

add your name and copyright info, delete the black background layer and resize if needed. your done.


Sunday, 7 December 2014

Snow Days


For this tutorial you will need:
A tube of choice, I am using the art of PinUpToons, to use this tube
you will need to purchase it from CDO here
The gorgeous Scrap kit IB PinUpToons  206-2  by Ladyhawwk here
Filters used
Eyecandy 4000, Gradient glow
VanDerLee Snowflakes

Open a transparent canvas 600 x 600, flood fill with white,

Set your background color to a color of choice, one that compliments your tube, select the ellipse tool draw out a circle around the same size as the one shown below.


Do not convert to raster layer yet,select the text tool, select your font I used Navel,size 36, create as vector, hover near the edge of the circle until you see a curve below the A text curser, then click on the canvas, type SNOW DAYS ARE THE BEST DAYS. 

open the layers up by clicking on the + On the New Ellipse layer, right click and convert to raster selection, then open paper 3, copy and paste as a new layer, go to selections, invert then hit delete on your keyboard, now close off the visibility on the new ellipse layer and convert to raster layer.

On the snow days layer, go to effects, plugins, eyecandy 4000, gradient glow, choose fat then set the glow width to 3, apply.

On the paper 3 layer, go to image, resize and resize by 90%, resample using bicubic, resize all layer unchecked then go selections, select all, selections, float, selections, defloat, selections, modify, select selection borders, both sides checked, border width 4, anti alias checked. flood fill with a light color that compliments your tube, selections, select none, go adjust, add/remove noise, add noise, set the noise at 40%, uniform checked and monochrome checked.

Still on the paper layer, then go to layers, duplicate 2 times for a total of 3 layers, then go to layers, properties, change the names of these 3 layers to p1, p2 & p3. 

On the P1 layer, go to selections, select all, selections, float, selections, defloat go to effects, plugins, VanDerLee snowflakes, apply the following settings.


Repeat the last steps on the p2 & p3 layers changing the random seed each time, close out the p2 & p3 layers.

On the p3 layer go to selections, select all, selections, float, selections, defloat then copy and paste your tube as a new layer, arrange to your liking, change the blend mode of this layer to soft light, open Ele 27, copy and paste as a new layer then go to selections, invert then hit delete on your keyboard, on both the tube and the Ele 27 layers back to selections, select none.

Open Ele 4 copy and paste as a new layer onto the canvas, go to image, resize and resize by 65%, no drop shadow, move to the bottom of the cirlce.

Open Ele 13, copy and paste as a new layer onto the canvas, go to image, resize and resize by 70%. arrange to your liking.


Open Ele 17, copy and paste as a new layer onto the canvas, go to image, resize and resize by 70%. arrange at the end of the fence, no drop shadow.

Open Ele 2, copy and paste as a new layer onto the canvas, go to image, resize and resize by 45%. arrange at the end of the fence, you can add a slight drop shadow if desired, I used H2, V -2, opacity 22, blur 4, color black, (when using a drop shadow please make sure none of the element or tube is below the snow it will effect the animation).

Copy and paste your tube as a new layer, resize and arrange to your liking, add a drop shadow.

Open Ele 3, copy and paste as a new layer onto the canvas, go to image, resize and resize by 45%. arrange at the end of the fence, add a slight drop shadow.

Open Ele 11, copy and paste as a new layer onto the canvas, go to image, resize and resize by 30%. arrange so its hanging on the top of the circle, add a slight drop shadow.

Add your name and copyright info. delete the white bg layer, resize if required. your ready to animate.

Animation

Open animation shop, in paint shop, go to edit, copy merged, then in animation shop, edit, paste as new animation

In paint shop, hide p1 layer and open p2 layer, then go to edit, copy merged, in animation shop, go to edit, paste after current frame.

In paint shop, hide p2 layer and open p3 layer, then go to edit, copy merged, in animation shop, go to edit, paste after current frame.

save. your done!