Showing posts with label Autumn. Show all posts

Thursday, 23 September 2021

Scarecrow


For this tutorial you will need:
A tube of choice, I am using the art of Alehandra Vanhek to use this tube you will need to purchase it from PFD Here
A beautiful Scrappin' Your Heart Out September blog train freebie by Miggins Here
Mask 202 by The Asylum. page 23 last mask Here  & My mask from Set 5 -  MD14-23 Here

Filters used
Xero Radiance optional 
MuRa's Meister Copies

Open a blank canvas 750 x 750, Flood fill with white 
Add a new raster layer, Selections, select all copy & paste (C&P from here) paper 4 into selection, selections, select none.
Apply The Asylum mask 202, right click on the layer, merge, merge group.

Add a new raster layer, Selections, select all C&P paper 3 into selection, selections, select none.
Apply my mask MD_14_23, right click on the layer, merge, merge group.

Open Element 32, go to image, resize and resize by 30% then apply MMC copies - Encircle - with default settings, resize to 110% Add a Drop shadow (DS from here)

C&P element 15, resize by 75%, duplicate this layer & mirror, right click the duplicate layer merge, merge down, add a DS

C&P element 1, resize by 70% arrange on the right hand side, add a DS

C&P element 20, resize by 65%, move slightly left, add a DS

C&P element 3, resize by 45%, move to the edge of the wheel, see m tag for reference, add a DS

C&P element 14, resize by 75%, arrange on the right, add a DS

C&P element 18, resize by 50%, move left just in front of flowers, add a DS

C&P your tube of choice, resize to your liking, move slightly right, 

--------------

Optional
Duplicate this layer, add a gaussian blur radius 2, then add xero radiance with the following settings


change the blend mode of this layer to screen, add a DS to the original layer.

--------------

C&P element 6, resize by 50%, arrange beneath the tube layers on the right, add DS.

C&P element 5, resize by 20%, move left just in front of fox, see my tag for reference, duplicate this layer and mirror add a DS, duplicate again, free rotate 45 degrees left arrange to your liking.

C&P element 17, resize by 25%, move left just in front the fox, add a DS

C&P element 19, resize by 30%, move left by the group of nuts, add a DS

Add your name and copyright info. Thank you for trying my tutorial, I hope you enjoyed it.


Saturday, 21 August 2021

Autumn Beauty


For this tutorial you will need:

A tube  of choice, I am using the art of Alex Prihodko
to use this tube you will need to purchase it from PFD Here 
The beautiful FTU SYHO August Blog Train kit by Miggins  Here
My Selection here
Mask 4, from mask set 54 by Rocked by Rachel Here
Picture of choice or the one I used by Valiphoto's at Pixby here


Put the circle selection into your selections folder. 

Open a transparent canvas 700 x 700, flood fill with white.

Add a new raster layer, Go to selections, select all, (copy and paste (C&P))   miggs_syhobt_augblogtrain (22) (I'm going to shorten the name from here (msa-22.jpg) into selection, select none.

Apply mask 4, merge, merge group 

Open msa-20.png C&P onto canvas, go to Effects, MurA's Meister Copies, select encircle from the dropdown menu, Number at 12, Shift X & Y at 50, apply, Add a (Drop Shadow (DS)) I used 0,-4,56,8 throughout.

Add a new raster layer, go to selections, Load/Save selection, Load selection from disk, look for AB_CircleSelec and apply,

C&P the autumn Road pic into selection, select none.

Open msa-31.png C&P onto canvas, go to Image, resize and resize by 85%, add a DS.

Open msa-37.png C&P, resize by 65%, arrange to the right of the branch circle, add a DS then right click on the layer, duplicate, then go to image and mirror.

Open msa-5.png C&P onto canvas, go to image, resize and resize by 60%, arrange on the right of the branch circle, add a DS.

Open msa-30.png C&P onto canvas, resize by 45%, arrange on the left of the branch circle add a DS.

Open msa-24.png C&P onto canvas, resize by 20%, arrange on the left of the branch circle add a DS.

C&P your tube of choice, Resize to your liking, do the thing you do! I add a gaussian Blur of 2, and used xero radiance setting below. add a DS.


Open msa-3.png C&P onto canvas, resize by 50%, arrange on the right, add a DS.

Open msa-32.png C&P onto canvas, resize by 35%, arrange in front of the small pumpkin, add a DS

Open msa-23.png C&P onto canvas, resize by 15%, arrange in front of the small green pumpkin, add a DS

Open msa-19.png C&P onto canvas, resize by 25%, arrange to your liking, add a DS add any other leaves you want, some of the leaves were part of the tube I used.

Add your name, copyright info. we are done, I hope you enjoyed this tutorial.

Tuesday, 9 February 2021

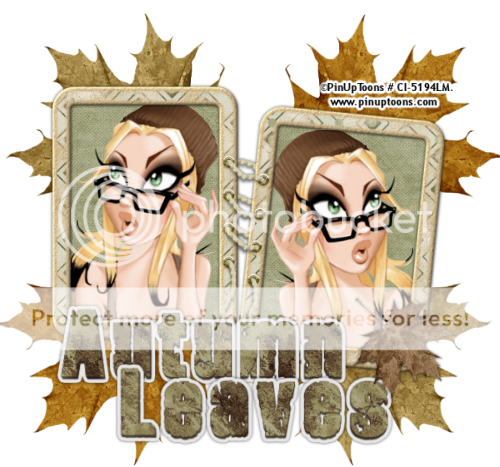
Autumn Leaves

 Image-2.jpg picture by mythical323

For this tutorial you will need

A tube of choice, I am using the art work of pinuptoons to use this tube you will
need to purchase it from from CDO here

Scrap Kit Early Autumn by melissa at Sentimental Style Here


Open a blank canvas 600 x 600, flood fill with white.

Open the double cardboard frame, copy and paste as a new layer.
Resize by 80%, smart size, resize all layers unchecked.

Add a drop shadow H & V 0, Opacity 70, Blur 5.
Take the magic wand, tolerance 0, feather 0, modify, expand by 7 pixels.

Copy and paste a paper of choice as a new layer, selections, invert and hit delete on your keyboard. Selections, select none, move this layer below the cardboard frame.

Activate the cardboard frame layer and click inside the first frame with the magic wand. Selections, modify, expand, and expand by 7 pixels. Copy and paste your tube as a new layer, position to your liking, selections, invert, make sure the tube layer is active and hit delete on your keypad.

Repeat the above steps for the second frame. But mirror you tube.

Click on the white background layer to activate it, copy and paste the leaves to your liking. Hide the frame layer, the tube layers and the white background layer, merge, merge visible, unhide layers.

Copy and paste the autumn and leaves word art on to your canvas, resize each by 90%, smart size, resize all layers unchecked, position to your liking, merge, merge down, add the same drop shadow as before.

Choose a leaf from the scrap kit and resize by 45%, smart size, resize all layers unchecked, and position at the end of the word art, see my tag for reference. Add the same drop shadow as before.

Add your name and copyright information. You are done!


Proud member of Tutorial Writers Inc

Tutorial written by © Mythical
all rights reserved