Showing posts with label FTU Tutorials. Show all posts

Friday, 26 August 2022

Tranquil Moments


For this tutorial you will need:

A Tube of choice I am using the art of Very Many
to use this tube you will need to purchase it from Verymanytubes HERE
My SYHO August Blog Train freebie HERE
Rachel Designs Mask 754 HERE


Drop shadow used throughout V 0, H -4, opacity 40, blur 10


Open a transparent canvas 700 x 700. Flood fill with white.

Copy & Paste (C&P) Paper 6 onto the canvas 

Open the mask in PSP, go to layers, New mask layer, From image, Select the mask in the dropdown menu & apply, right click this layer, merge, merge all.

C&P Element 16 (E16) as a new layer, duplicate arrange as shown below


C&P E32 as a new layer, arrange on the right above the sand add a Drop Shadow (DS)

C&P E9 as a new layer, Resize by 85%, arrange in front of the rocks, add a DS

C&P E38 as a new layer, Resize by 70%, left of the life ring, add a DS

C&P E17 as a new layer, Resize by 70%, arrange at the bottom of the light house

C&P E11 as a new layer, Resize by 40%, arrange in front of the grass, add a DS

C&P E22 as a new layer, Resize by 65%, arrange on the left side of the life ring

C&P your tube of choice as a new layer, resize and arrange to your liking, duplicate the tube layer, on the duplicate layer add a gaussian glow set to 2, change the blend mode to soft light, add a DS to the original tube layer

C&P E25 as a new layer, Resize by 70%, arrange in front of the tube, add a DS.

C&P E25 as a new layer, Resize by 70%, arrange in front of the tube, add a DS.

C&P E40 as a new layer, Resize by 20%, arrange in in the sand, add a DS.

Delete the white background layer if saving in PNG format

Add your name & copyright info. Thank you trying out my tutorial.


Thursday, 23 September 2021

Scarecrow


For this tutorial you will need:
A tube of choice, I am using the art of Alehandra Vanhek to use this tube you will need to purchase it from PFD Here
A beautiful Scrappin' Your Heart Out September blog train freebie by Miggins Here
Mask 202 by The Asylum. page 23 last mask Here  & My mask from Set 5 -  MD14-23 Here

Filters used
Xero Radiance optional 
MuRa's Meister Copies

Open a blank canvas 750 x 750, Flood fill with white 
Add a new raster layer, Selections, select all copy & paste (C&P from here) paper 4 into selection, selections, select none.
Apply The Asylum mask 202, right click on the layer, merge, merge group.

Add a new raster layer, Selections, select all C&P paper 3 into selection, selections, select none.
Apply my mask MD_14_23, right click on the layer, merge, merge group.

Open Element 32, go to image, resize and resize by 30% then apply MMC copies - Encircle - with default settings, resize to 110% Add a Drop shadow (DS from here)

C&P element 15, resize by 75%, duplicate this layer & mirror, right click the duplicate layer merge, merge down, add a DS

C&P element 1, resize by 70% arrange on the right hand side, add a DS

C&P element 20, resize by 65%, move slightly left, add a DS

C&P element 3, resize by 45%, move to the edge of the wheel, see m tag for reference, add a DS

C&P element 14, resize by 75%, arrange on the right, add a DS

C&P element 18, resize by 50%, move left just in front of flowers, add a DS

C&P your tube of choice, resize to your liking, move slightly right, 

--------------

Optional
Duplicate this layer, add a gaussian blur radius 2, then add xero radiance with the following settings


change the blend mode of this layer to screen, add a DS to the original layer.

--------------

C&P element 6, resize by 50%, arrange beneath the tube layers on the right, add DS.

C&P element 5, resize by 20%, move left just in front of fox, see my tag for reference, duplicate this layer and mirror add a DS, duplicate again, free rotate 45 degrees left arrange to your liking.

C&P element 17, resize by 25%, move left just in front the fox, add a DS

C&P element 19, resize by 30%, move left by the group of nuts, add a DS

Add your name and copyright info. Thank you for trying my tutorial, I hope you enjoyed it.


Saturday, 21 August 2021

Autumn Beauty


For this tutorial you will need:

A tube  of choice, I am using the art of Alex Prihodko
to use this tube you will need to purchase it from PFD Here 
The beautiful FTU SYHO August Blog Train kit by Miggins  Here
My Selection here
Mask 4, from mask set 54 by Rocked by Rachel Here
Picture of choice or the one I used by Valiphoto's at Pixby here


Put the circle selection into your selections folder. 

Open a transparent canvas 700 x 700, flood fill with white.

Add a new raster layer, Go to selections, select all, (copy and paste (C&P))   miggs_syhobt_augblogtrain (22) (I'm going to shorten the name from here (msa-22.jpg) into selection, select none.

Apply mask 4, merge, merge group 

Open msa-20.png C&P onto canvas, go to Effects, MurA's Meister Copies, select encircle from the dropdown menu, Number at 12, Shift X & Y at 50, apply, Add a (Drop Shadow (DS)) I used 0,-4,56,8 throughout.

Add a new raster layer, go to selections, Load/Save selection, Load selection from disk, look for AB_CircleSelec and apply,

C&P the autumn Road pic into selection, select none.

Open msa-31.png C&P onto canvas, go to Image, resize and resize by 85%, add a DS.

Open msa-37.png C&P, resize by 65%, arrange to the right of the branch circle, add a DS then right click on the layer, duplicate, then go to image and mirror.

Open msa-5.png C&P onto canvas, go to image, resize and resize by 60%, arrange on the right of the branch circle, add a DS.

Open msa-30.png C&P onto canvas, resize by 45%, arrange on the left of the branch circle add a DS.

Open msa-24.png C&P onto canvas, resize by 20%, arrange on the left of the branch circle add a DS.

C&P your tube of choice, Resize to your liking, do the thing you do! I add a gaussian Blur of 2, and used xero radiance setting below. add a DS.


Open msa-3.png C&P onto canvas, resize by 50%, arrange on the right, add a DS.

Open msa-32.png C&P onto canvas, resize by 35%, arrange in front of the small pumpkin, add a DS

Open msa-23.png C&P onto canvas, resize by 15%, arrange in front of the small green pumpkin, add a DS

Open msa-19.png C&P onto canvas, resize by 25%, arrange to your liking, add a DS add any other leaves you want, some of the leaves were part of the tube I used.

Add your name, copyright info. we are done, I hope you enjoyed this tutorial.

Tuesday, 20 July 2021

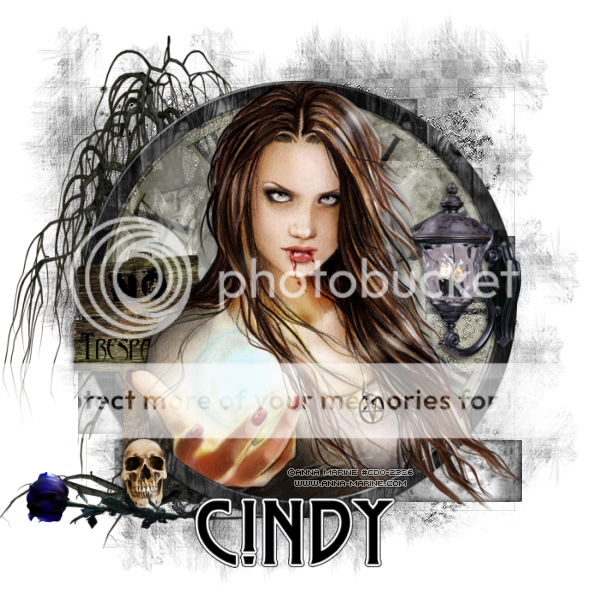
FTU Tutorial Darkness


For this tutorial you will need:
Tube of choice I am using the fantastic work
of Anna Marine, you can purchase this tube at CDO Here
My FTU darkness kit HERE

Filters used
MuR's Meister Copies
Xero Radiance Optional


Open a new transparent canvas 700 x 700, flood fill with white

Add a new raster layer, select all Copy & Paste (C&P from here) MDd-Paper5 into selection, right click on this layer,

merge, merge group, resize this layer by 95%.

C&P MDd-Ele1 on to the canvas and move to the top, see my tag for reference.

C&P MDd-Ele22, Resize by 50%, Move to the top right, go to adjust, Softness, Soften.

C&P MDd-Ele29, Resize by 50% Add MuRa's Meister Copies with the following settings


resize by 90%, Then go to Image, sharpen, sharpen.

C&P MDd-Ele30, resize by 25%, Add MuRa's Meister Copies Change the number to 18 Shift X to 50 & Shift Y to 70

Add a Drop Shadow (DS from here) of V 0, H -5, Opacity 45, Blur 9 (these settings are used throughout).

C&P MDd-Ele4, resize to 15%, add MM Copies gain but change the number to 21 Shift X to 55 shift Y to 65 add a DS.

Open MDd_Fr4 Copy & paste  onto the canvas, go to Image, Resize and resize by 70% 

go to effects 3D Effects, inner bevel and apply with the following settings.


Activate the magic want, tolerance & Feather set at 0, click in the center of the frame, 

selections, modify, expand by 5 pixels, add a new raster layer C&P MDd-paper2 into selection, 

move this layer below the frame layer  

C&P your tube of choice, position to your liking, Duplicate the frame layer and move above the tube layer, 

activate the eraser tool and erase any part of the frame hiding to tube, then with the tube layer active

erase the parts of the tube showing below the frame, add a DS to the original frame layer 

__________________

Optional

Duplicate the tube layer, on the duplicate layer go to Adjust blur Gaussian blur set to 3, 

apply on the same layer go to Xero Radiance and apply the following settings


Change the blend mode to screen, Lower the opacity of this layer to your liking I set mine to 80%

Add a DS to the original tube layer.

_______________

C&P MDd-Ele3, resize by 50%, Image, Rotate, free rotate 75 Right, Place at the bottom left add a DS, Duplicate this layer then image, mirror, 

right click on the duplicate layer, merge, merge down.

C&P MDd-Ele14, resize by 75%, arrange to the left of the frame, add a DS.

C&P MDd-Ele34, resize by 75%, arrange to the right of the frame, add a DS.

C&P MDd-Ele2, resize by 30%, Image, Rotate, free rotate 90 left, arrange to the left of the frame, add a DS

duplicate this layer then image, mirror, right click on the duplicate layer, merge, merge down.

C&P MDd-Ele30, resize by 25%, arrange a little to the left, add a DS, duplicate this layer then image, mirror.

C&P MDd-Ele15, resize by 50%, arrange a little to the left next to the blue rose, add a DS.

C&P MDd-Ele17, resize by 25%, arrange a little to the right next to the blue rose, add a DS.

C&P MDd-Ele16, resize by 60%, arrange in the bottom center, add a DS.

C&P MDd-Ele20, arrange a little to the left.

Add your name and copyright info

Thank you for trying out my tutorial
I hope you liked it!


x

Sunday, 25 April 2021

Everyday Moments


For this Tutorial you will need:
A tube or image of choice, I am using the art of Suzanne Woolcott,
you can purchase her tubes here
Brush 26 by agi at Deviant art here
FTU Kit from the Scrap Designers Blog Train
By Miggins Here 
Spring Mask 4 by Whippy
From Creative Misfits Creations Here


Open a blank canvas 700 x 600, flood fill with white

Add a new raster layer, selections, select all, open sdb EasterSkies(1) and paste into selection

open the mask, layers, from image select SpringMask4_CM_MBW_0321 from the dropdown menu, apply, right click on the layer, merge, merge group.

Open sdb easterSkies (26) Copy & Paste as a new layer (known as C&P from here) image, resize, resize by 15%

Open sdb easterSkies (28) C&P onto canvas & resize by 45%

Open sdb easterSkies (27) C&P onto canvas & resize by 60%

Open sdb easterSkies (25) C&P onto canvas & resize by 15%, move slightly left and down toward the corner, see my tag for reference.

Open sdb easterSkies (14) C&P onto canvas & resize by 35%, activate the selection tool, rectangle Feather 0 draw out a rectangle around the frame as shown in the Screen shot below

For this i used the image that came with the Suzanne Woolcott tube but you could use a paper and tube just as easily

C&P your chosen image (paper then tube) position to your liking, selections, invert then hit delete on the keyboard (both paper & tube if you used them. Add a drop shadow to the frame V5,H5,opasity33,Blur6 

Open sdb EasterSkies (18) C&P onto canvas & resize by 15%, arrange on the right so it hides the open ends of the frame.

Add a new raster layer, Set your foreground colour to #808eac Select the agbrush 26 Position the brush where desired, add the following drop shadow V-2, H2, Opacity 75 Blur 2, change the color to white.

Add your name & copyright info

Hope you enjoyed my tutorial

Saturday, 13 March 2021

Mythical Realm


https://picsfordesign.com/en/catalogue/a166487.pix

For this Tutorial you will need:
A tube of choice I am using an exclusive pre paid project tube by Alec Rudd
to use this tube you will need to purchase it from Pics For Design Here
FTU Mythical Realm kit Here
Mask129 from Moonbeams & Spiderwebs Here
Selection Here

Filters Used
Gradient Glow
Penta Colordot

Drop Shadow used throughout V3, H-5, Opacity 55, Blur 8

Open a new canvas 700 x 700, 

Copy and paste (Now C&P from here) Ele 9 onto your canvas, open Ele 54 C&P move toward the top of Ele 9, right click on the top layer, merge, merge down, apply MB and SW mask merge group.

C&P Ele 30, Resize by 90%, move to the bottom, drop shadow (ds From here)

C&P Ele 17, resize to 40% arrange top right

C&P Ele 43, arrange at the bottom right add a ds, see my tag for reference 

C&P Ele 59, resize by 90%, arrange at the bottom of the waterfall

C&P Ele 60, move to the left add a ds.

C&P Ele 38, (oops looks like I included 2 of these ) resize to 35%, arrange bottom left

C&P FR 4, resize by 75%, go to selection, look for MR-FrameSelection and load, C&P PP2, then C&P your close up, duplicate the close up layer add Xero radiance, default setting, add a gaussian blur set to 3, change the blend mode to screen, selections, Invert, hit delete on these 2 layers, On the close up layer apply Penta ColorDot with default settings move the frame layer above, merge down 2 times, Add a small Gradient Glow to the frame with the following settings, Change Glow width to 3, click on the colour tab, choose Thin & change the colour to #b0dcc4, apply.

C&P Ele 47, resize by 45% place at the bottom move slightly to the right, add a ds.

C&P Ele 4, resize by 40% Place on the bottom right, add a ds.

C&P Ele 54, resize by 45%, place on bottom right, add a ds.

C&P Ele 7, resize by 10%, place on bottom right, add a ds.

C&P 39, resize by 20%, arrange at the top right, add a ds.

C&P Ele 39, Resize by 25%, arrange on top of the waterfall, add a ds.

C&P Ele 50, resize to 20% place top right by the tower, add a ds.

C&P your tube, resize, arrange bottom left, duplicate this layer, on the duplicate layer add gaussian blur set to 5, change the blend mode to soft light.

Add any other elements you want to make it your own.

Add © info, Thank you for trying out my tutorial 


Wednesday, 3 March 2021

Mythical Fantasy


For this Tutorial you will need

A tube of choice I am using Valyria & the Dragon By Abbey Dawn at EleganceFly, you can purchase the tube here 
My FTU Mythical Fantasy kit Here
Mask_Vivienne_0053 Here
Font of choice, I used Agenda King


Drop Shadow used V0, H4, Opacity 67, Blur 10 (Known throughout as ds) 

Open a blank canvas 700 x 700, flood fill with white.

Copy & Paste (C&P) Mask_Vivienne_0053 as a new layer
Selections, select all, selections, float, selections, defloat, copy & Paste Paper 4 as a new layer, Selections invert & hit delete, selections, select none, delete the original mask layer.

C&PE10 move slightly up & left.

C&P E38, resize by 80% move up the canvas 

C&P E37, resize by 70%, ok you should now have something like this


C&P E53, resize by 80% add a ds

C&P E32 as a new layer, resize by 65%, arrange just under the mushroom image, Duplicate this layer, image, flip move down to the bottom see my tag for reference.

C&P E44, resize by 45% add a ds, duplicate mirror.

C&P E31, resize by 40% place below layer 32 to the right, duplicate, image mirror add ds to these layers.

C&P E7, leave it where it sits

C&P E21, resize by 40% , image rotate, free rotate by 90 degrees right, all layers unchecked, add a ds, arrange just under the orb on the left, duplicate this layer, image, mirror.

C&P E12, resize by 40%, add a ds, arrange on the upper left.

C&P E9, move to the right, see my tag for reference, duplicate on the duplicate layer, adjust blur, gaussian blur, set radius to 5 apply, change the blend mode to Screen lower the layer opacity to around 64, just to give it that magical glow, add a ds to the original unicorn layer'

C&P your tube as a new layer, resize by 30%, image, mirror - If you are using a different tube you may want to re arrange the unicorn to your liking - repeat the steps above with the unicorn on the layers but change the blend mode to soft light.

C&P E44 again, resize by 45% place to the right in front of the tube add a ds.

C&P E43, resize by 25% place at the left of the flowers, add a ds.

C&P E13, resize by 15%, place on the mushroom, add a ds.

C&P E49, Place at the bottom of the mushrooms, add a ds.

C&P E42, Place at the left by the dragon. add a ds

C&P E50, resize by 25%, Duplicate and mirror this layer, resize the duplicate layer by 85%, arrange at the left in front of the plant.

Add name & copyright info.


Saturday, 20 February 2021

Hurry Up Spring


For this tutorial you will need:

A tube of choice I am using the art of VeryMany, 
to use this tube you will need to purchase it from VeryManyTubes Here
FTU Scrapkit by Miggins part of the Scrappin' Your Heart Out Blog Train Here
be sure to check out the other goodies riding the train
Font of choice I used Leathering Demo Here
My Mask Here Just right click and save image as

Filters Used:
Mura's Meister Copies
xero Graytinter
VanDerLee UnPlugged-X Interlace


Open a new image Width 700 x Height 700. Flood fill with white

open the mask MD_HurrySpring.

Add a new raster layer to your working canvas, open Paper021 go to selection, select all & paste the paper into selection, select none then go to layers, new mask layer, from image, find the mask in the dropdown menu, source illuminance checked & apply

open E(3) Copy & paste onto the canvas, resize by 15%, then apply MuRa's Meister Copies, Select encircled from the drop down menu Number on 12, apply, Add a drop shadow I used -3, 3, 40, 6

open E(9) Copy & paste onto the canvas, resize by 10%, then apply MuRa's Meister Copies, Select encircled from the drop down menu Number on 10, apply, Add the same drop shadow.

open E(8) Copy & paste onto the canvas, resize by 25%, Select the middle with the selection too, go to selection, modify, expand by 18, then back to selections, feather by 22, add a new raster layer below E(8) fill with a colour complimentary to your tube of choice & fill, them selection, invert and hit delete, keep selected copy and paste your tube or closeup, position to your liking then hit delete, selections, select none, change the blend mode of this layer to soft light, or which ever blend you prefer, then add xero Graytinter on default settings, apply VDL Interlace default settings

Go to the crop tool Width & Height both set at 700 hit the tick.

open E(4) Copy & paste onto the canvas, resize by 15%, Image, Mirror, arrange at the right bottom of the frame, add a drop shadow.

open E(7) Copy & paste onto the canvas, resize by 15%, arrange at the top left of the frame, add a drop shadow.

Copy and paste your tube Resize & position to your liking, duplicate this layer, go to adjust, blur, gaussian blur, radius 3, apply, change the blend mode of this layer to Screen or soft light.

Add your name & copyright info. You are done! 


Saturday, 13 February 2021

ArtAttack


For this tutorial you will need:
A tube of choice I am using the art of Eugene Rzhevskii, 
to use this tube you will need to purchase it from PicForDesign Here
Fonts of choice I used Pixette & ChildishKid Here & Here
Texture of choice

Filters Used
Penta color dot
Eyecandy 400 (Optional)

Open a new canvas Width 675 height 275, Choose 2 colours from your tube foreground & background, select the foreground-Background gradient, Linear, Angle 45 repeats none, flood fill the canvas.

Copy & Paste your chosen tube as a new layer, duplicate a few times, arrange across your canvas as shown below.


Copy and paste your texture of choice arrange, colourise, resize to your liking, change the blend mode of this layer to screen or whatever looks best.

Select the crop tool Width 675 Height 275, merge opaque, apply, Merge, Merge visible

Apply color dot default setting.

Select the rectangle tool, Line width 1, line style Dot, change leave the foreground colour set to the gradient, background null, draw out a rectangle as shown in the screen shot below, right click on the layer in the layer palette, convert to raster, Duplicate the layer, go to image, resize & resize by 90%, image, mirror, 


With the merged layer active, activate the selection tool Rectangle, feather 0, draw out the first dotted rectangle (I had to zoom in for this) Right click on the merged layer & promote layer to selection, change the blend mode of this layer to Burn, selections select none.

Repeat these steps with the inner dotted rectangle but change the blend mode of the promoted layer to overlay.

Select a pixel font. I used Pixette Size 6 Anti-alias off, Type whatever you want then right click convert to raster layer. place in the gap at the top between the dotted lines. see my tag for reference

Duplicate this layer and move below between the bottom lines.

Copy & paste your tube as a new layer, resize and arrange to your liking. duplicate the tube layer, on the duplicate layergo to adjust, blur, avaerage set to 5 & apply, now change the blend mode of this layer to screen or whichever mode you prefer,on the bottom tube layer, add a drop shadow.

Add a new layer on top flood fill with one of the colours from your gradient, go to selkections, select all, selections modify, contact by 4 hit enter then delete, selections, select none

Add another raster layer, floodfill with the other colour from your gradient, repeat the above steps by contract by 2

Add your name & copy right info. You are done!


Wednesday, 10 February 2021

Winterlicious


For this tutorial you will need:
A tube of choice, I am using the art of Zalta_M
to use this tube you will need to purchase it from PDF Here
 
VanDerLee Snowflakes filter Here
Texture Pack #109 by Sanami276 at DevientArt 
here

1.

Open a blank canvas 675 x 275, flood fill with white.

Add anew raster layer, Go to selections, select all

Copy & paste one of the textures from the pack #109,

 I used Texture 30 into selection. colourise to compliment your tube

2.

Copy and paste your tube as a new layer, arrange to your liking, duplicate the layer, go to image & mirror arrange as desired, right click the layer, merge, merge down, change the blend mode to screen or soft light which ever looks better.

3.

Activate the pen tool, choose draw lines and polylines, line style dots, Width 2, anti alias checked, colour black, holding shift draw a line across the tag, right click the layer, convert to Raster layer.

4.

Repeat step 3 but change the colour to one that compliments your tube, place the two lines close to each other, merge the two lines together, duplicate, go to image, flip arrange close to the other lines leaving a gap for your words (see my tag for reference)

5.

Activate the text tool choose a pixel font, I used Bank Gothic Condensed  size 8, colour black in caps type out Winterlicious fun or words of your choice, right click the layer convert to raster layer.

6.

Change the font to a thick font, I used Impact size 55, change the colour to white or a very light colour from your tube type out winter in caps, go to, image, rotate, free rotate and rotate 90 degrees left, arrange to the side of the tag leaving a small gap all around, convert to raster layer, add a drop shadow I used V&H 1, Opacity 53, blur 1. Change the blend mode of the layer to soft light, multiply or overlay which ever looks best.

7.

Repeat step 6 but rotate 90 degrees right.

8.

Go to layers, merge, merge visible then selections, select all, modify, select selection borders, inside, border width 6.

9.

Go to Adjust, brightness and contrast, brightness/contrast, change the brightness to 50, contrast 0, selections, select none

10.

Copy and paste your tube of choice as a new layer, resize if needed, arrange to your liking, Duplicate change blend mode to one you like (Optional) add a drop shadow to the bottom tube layer H 3 V -3 Opacity 20 blur 6, select the crop tool, snap crop rectangle to merged Opaque, apply the repeat step 9 on your tube layer.

11.

Add a new raster layer, move to the top,
flood fill with a colour that compliments your tube, go to selections
select all, modify, contract by 1 pixel then hit delete on your keyboard
Add your name & copyright info.

If you are not animating you are done.

Animation

1.

Duplicate the bottom merged layer 2 times for a total of 3 layers, rename the layers 1,2 & 3

2.

Make layer 1 active apply VanDerLee Snowflakes with the following settings.


3.

Apply VanDerLee snowflakes to layers 2 & 3 with the same settings but change the random seed each time. Hide layers 2 & 3

4.

Open Animation shop(AS), In Paint Shop(PS) go to edit, copy merged over in AS go to edit and paste as new animation

5.

In PS hide layer 1, unhide layer 2, go to edit, copy merged over in AS go to edit and paste after current frame.

6.

In PS hide layer 2, unhide layer 3, go to edit, copy merged over in AS go to edit and paste after current frame. Save Tag

Avatar

1.

Open a blank canvas 180 x 180 copy and paste layer 3 from your tag as a new layer, arrange to your liking, copy and paste your tube as a new layer, arrange to your liking, merge visible.

2.

select the crop tool, snap crop rectangle to merged Opaque, apply

3.

Repeat step 9, add your name and copyright Information


Your Done!

Avatar.png picture by mythicaldesigns

Image2.gif picture by mythicaldesigns


Proud member of Tutorial Writers Inc 

Tutorial written by © Mythical
all rights reserved

Trick or Treat


 For this tutorial you will need:

A tube of choice, I am using the art of VeryMany Tubes,
to use this tube you will need to purchase it from VeryManyTubes Here

My Supplies 
here

This is a quick & Easy tut


Drop shadow used throughout H 3, V – 3, Opacity 66, Blur 8, colour Black

Open a blank canvas 700 x 700 flood fill with white

add a new raster layer, go to selections, select all, 

Copy and paste the paper into selection, selections, select none.


Open the mask, go to Layers, new mask layer then from image, select Halloween_MMask2 from the drop down menu and apply, Right click on that layer, merge group.
 

Copy and paste the frame as a new layer, move slightly to the left activate the magic wand, tolerance 10, feather 1, mode add(shift) on all 4 black parts of the frame, copy and paste the tree image or the image of your choice as a new layer, go to image, resize and resize by 70%, Smart size, resize all layers unchecked go to selections, invert and hit delete on your keyboard, add a drop shadow to the frame.
 

Copy and paste the broom stick as a new layer, go to image, rotate, free rotate and rotate 6 degrees right, make sure rotate all layers is unchecked, add a drop shadow

Copy and paste your tube as a new layer resize & arrange as desired, add a drop shadow.
 

Open the word art colourize the trick Treat layer to match your tube, colourize the OF layer to your liking Go to edit copy merged and paste as a new layer, go to image, resize and resize by 60%, Bicubic, resize all layers unchecked, I added a thin gradient glow 2 times(optional) 
 

Add your name & Copyright Information. Your done!


Proud member of Tutorial Writers Inc 

Tutorial written by © Mythical
all rights reserved

The Witching Hour

 image


For this tutorial you will need:
A tube of choice, I am using the art of Anna Marine, to use this tube you will need to purchase it from The Creative Design Outlet here
An Awesome PTU now FTU Kit called Gone Bad by Chichi Designz you can find it here 
mask295 by Weescotslass here Masks are listed down the side

Put the mask into your mask folder
Open a blank canvas 700 x 700 flood fill with white.

Copy and paste paper as a new layer, go to Image Load/Save mask, Load mask from Disk and select WSL_Mask297, go to Layers, Merge, Merge group.

Copy and paste the GlitterBling as a new layer.

Copy and paste the wall as a new layer.

Copy and Paste Tree 1 as a new layer, Position it as shown in the screen shot below.

image

Copy and paste the GhostClock as a new layer.

Copy and paste frame 1 as a new layer, go to Image, Resize and resize by 85%, Smart Size , Resize All Layers unchecked.

Copy and paste the Ghost as a new layer, go to Image, resize and resize by 80%, position him at 10 o'clock

Copy and paste the Sign as a new layer, go to Image, resize and resize by 50%, Position at the bottom left of the frame. add a drop shadow H2 V-2, Opacity56, blur 6, Colour Black

Copy and paste the lantern as a new layer, Go to Image, resize and resize by 35% position at the right of the frame so it looks like it is stuck to it, add the same drop shadow as above

Copy and paste your tube as a new layer, Position to your liking add a drop shadow H&V2, Opacity60, blur 10, Colour Black, Go to Image, duplicate, drag the original layer below the frame layer, Make sure the duplicate layer is active then with the eraser tool erase the tube to reveal the frame, make the original layer active and erase any part below the frame.

Copy and paste the Skull as a new layer, go to Image, resize and resize by 20%, posion at the foot of the sign, add the same drop shadow as used on the sign and lantern.

Copy and paste the FeatherRose as a new layer, Go to Image, mirror, back to Image, Resize and resize by  50%, lay the rose in front of the skull.

Add your name & copyright information. You are Done!


Proud member of Tutorial Writers Inc
Tutorial written by © Mythical
all rights reserved

Summer Lovin


For this tutorial you will need:
A tube of choice, I am using the fantastic art of VeryMany
to use her art you will need to purchase it fromVeryManyTubes here
Summer Lovin scrapkit from Spirits & Scraps here
Mask 38 by Tonya - here


Filter Used
Xero Moonlight

Drop shadow (ds) used throughout V0, H-5, Opacity 25, blur 10
Open a blank Canvas 700 X 700
copy and paste (C&P) one of the papers as a new layer I used Myth_Paper6, apply Tonya's Mask 38, right click the mask layer, merge, merge group.

C&P  Staci Summer Loving Element 8,  resize by 65%, move slightly to the right of the canvas, right click on the layer, duplicate then go to image and Mirror, right click on the top layer, merge, merge down add a ds.

C&P Myth_Element8 or 9 as a new layer, resize by 45%, move to the left of the canvas, duplicate, mirror, right click on the top layer, merge, merge down add a ds.

Copy and paste Ladyhawwk Frame 2 , resize by 85%, 
With the frame layer active, select the rectangle selection tool and select the frame as shown below


C&P Staci's paper 6, invert the selection and delete excess paper, C&P tube close-up arrange to your liking, delete, select none add Xero Moonlight with default settings to your close-up, add a ds to the frame layer. 


C&P Ladyhawwk_Element17 or 18, resize by 85%, Move below the paper layer under the frame at the upper left side, add a ds.


C&P Ladyhawwk_Element1, resize by 50% arrange at the right side of the frame, add a ds.


C&P Myth_Element 4 or 5, resize by 10%, rotate 22 left arrange on the upper left of the frame
Add your name and copyright information. You are done!

C&P your tube, resize & arrange to your liking, duplicate, on the duplicate layer  add gaussian blur set to 2, change the blend mode of this layer to screen, drop the opacity to around 70 add a ds to the original tube layer.

Add © Info
Thank you for trying my tutorial. I hope you enjoyed it.


Proud member of Tutorial Writers Inc
Tutorial written by © Mythical
all rights reserved

Summer Heat


For this tutorial you will need:
A tube of choice, I am using the art of Keith Garvey to use this tube
you will need to purchase it from CDO here

MizTeeques Orange Melody kit which you can find here  

Font Used Blue Plate Special here

Mask 32 by Tonya's Temptations  here 


Drop Shadow used throughout H0, V4, Opacity 55, Blur 8 

Open a blank canvas 700 x 700, flood fill with white.

Copy and paste (C&P) paper 10 apply Tonya's mask, Merge, merge group

Activate the ellipse tool, Set the background colour to #ecd358, foreground to null,  draw out a circle similar to mine in the screen shot below


Right click on this layer convert to raster layer, duplicate the layer, with the original layer active go to Eyecandy 400 Gradient Glow apply with the following settings


Now with the top circle layer active add a drop shadow V-4 H4 Opacity 20 Blur 30, creating a sun effect.

C&P Element 43, resize by 70%, Image, mirror add a drop shadow (ds)

C&P Element 22, Image, flip move up slightly, resize to 90% add a ds.

C&P Element 39, add a ds

Activate the rectangle tool, Line width 6, foreground colour white background set to null, draw out a rectangle similar to mine shown below


right click on the layer convert to Raster layer, duplicate the rectangle layer.

Activate the magic wand,, click inside the Duplicate frame layer, go to Selections, Modify and expand by 2 add a new raster layer below.  C&P Paper 3 into selection, Merge Merge down add a ds.

With the magic wand repeat the step above but this time use paper 2 & do not merge the layers, keep selected, rotate  both layers, right by 12 degrees

C&P your tube as a new layer, arrange to your liking, go to Selection, Invert, with your eraser tool erase any part of the tube showing below the bottom frame, go back to Selections, select none, add a ds to the frame.

Right click on your tube layer, duplicate, on the duplicate layer, go to Adjust, Blur, Average, set the Filter Aperture to 7, change the blend mode of this layer to Soft Light.

C&P Element 40, resize to 20% add a ds, duplicate this layer move upper left, duplicate the layer, image, flip, Image mirror, duplicate again resize to 70% move to upper right and repeat 

Add your Name & Copyright Information. You are Done!


Proud member of Tutorial Writers Inc
Tutorial written by © Mythical
all rights reserved

FU


For this tutorial you will need:
A tube of choice, I am using the art of Martin Abel, to use this tube
you will need to purchase it from Creative Design Outlet here

Filters Used:
Xero Fritillary & Radience
MuRa's Meister Copies
Toadies Mosaic Blur


1.
Open a new canvas Width 340 x Height 510, Flood fill with black.
Go to selections, select all, selections, Modify and contract by 20 then back to selections, modify, select selection borders inside checked, border width 25.
add a new raster layer, choose a bright colour from your tube of choice , Merge, flood fill, selection, select none, 

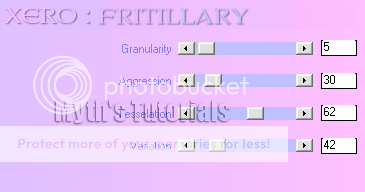
 go to Effects, plugins, Xero, Fritillary use the following settings.

image

With your magic wand, select the inside of the rectangle, go to selections, modify, expand by 2 add a new raster layer, copy & Paste your tube, resize if needed, Apply MuRa's Meister Copies, select wallpaper from the drop down menu and apply with default settings
apply Toadies Plain mosaic blur with default settings, change the blend mode of this layer to hard light then go to adjust, brightness and contrast, change brightness to 25, contrast 0, apply, selections, select none, move this layer below the frame layer,

Open another canvas Width 135 x Height 450, Flood fill with black. 
Go to selections, select all, selections, Modify and contract by 10 this time then back to selections, modify, select selection borders inside checked, border width 15.

add a new raster layer,  flood fill with white, selection, select none,
Click inside this frame with the magic wand, flood fill with another colour that matches your tube 
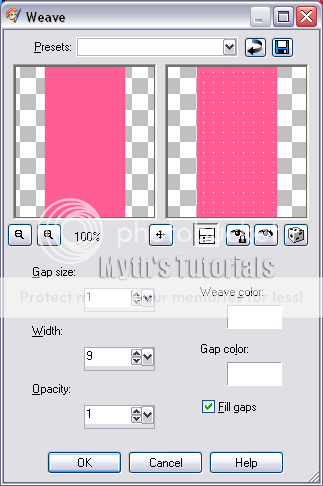
go to Effects, texture effects, weave add the following settings,

image

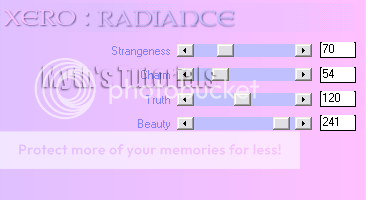
then go to selections, select all, selections float, selections de float, copy and paste your tube, resize and position to your liking, go to selections, invert hit delete on your keyboard, Selections, select none, duplicate the tube, on the original add xero radiance with the following settings, change the blend mode to Luminance legacy

image

On the duplicate layer go to Adjust, Blur, average set the Filter aperture to 9, change the blend mode of this layer to Soft Light, Move the frame layer above the tube layers.

open a new canvas 700 x 700

on the first tag we made copy merged & paste as a new layer onto the new canvas, add a drop shadow H3 V -3, opacity 36, blur 6.
Copy merged and paste the second tag we mage as a new layer, position to the side the duplicate & mirror 

So it should now look like the screen shot below


Select the rectangle tool, set the background colour to black the foreground to null and draw out a rectangle as directed below


Right click on the layer in the layer palette, convert to raster layer.
Go to selections, float, selections defloat then selections again, modify contact by 10.
add a new layer, flood fill with the colour you used on the smaller frames background, apply the 
Xero Fritillary as before, selections, select none, right click on this layer, merge, merge down, drag this layer to the bottom

Add your name. I used bank Gothic, black but changed the kerning to 350. Add copyright info. You are Done!


Proud member of Tutorial Writers Inc

Tutorial written by © Mythical
all rights reserved