

For this tutorial you will need:
A tube of choice, I am using the art of Martin Abel, to use this tube
you will need to purchase it from Creative Design Outlet here
Filters Used:
Xero Fritillary & Radience
MuRa's Meister Copies
Toadies Mosaic Blur
1.
Open a new canvas Width 340 x Height 510, Flood fill with black.
Go to selections, select all, selections, Modify and contract by 20 then back to selections, modify, select selection borders inside checked, border width 25.
add a new raster layer, choose a bright colour from your tube of choice , Merge, flood fill, selection, select none,
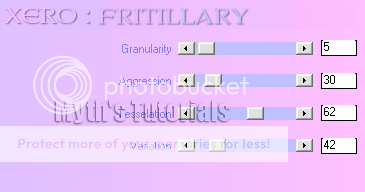
go to Effects, plugins, Xero, Fritillary use the following settings.
With your magic wand, select the inside of the rectangle, go to selections, modify, expand by 2 add a new raster layer, copy & Paste your tube, resize if needed, Apply MuRa's Meister Copies, select wallpaper from the drop down menu and apply with default settings
apply Toadies Plain mosaic blur with default settings, change the blend mode of this layer to hard light then go to adjust, brightness and contrast, change brightness to 25, contrast 0, apply, selections, select none, move this layer below the frame layer,
Open another canvas Width 135 x Height 450, Flood fill with black.
Go to selections, select all, selections, Modify and contract by 10 this time then back to selections, modify, select selection borders inside checked, border width 15.
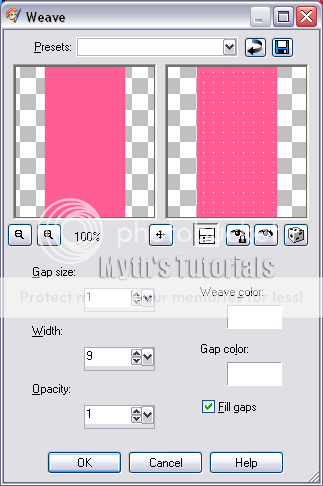
Click inside this frame with the magic wand, flood fill with another colour that matches your tube go to Effects, texture effects, weave add the following settings,
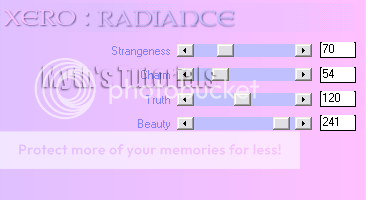
then go to selections, select all, selections float, selections de float, copy and paste your tube, resize and position to your liking, go to selections, invert hit delete on your keyboard, Selections, select none, duplicate the tube, on the original add xero radiance with the following settings, change the blend mode to Luminance legacy
On the duplicate layer go to Adjust, Blur, average set the Filter aperture to 9, change the blend mode of this layer to Soft Light, Move the frame layer above the tube layers.
open a new canvas 700 x 700
on the first tag we made copy merged & paste as a new layer onto the new canvas, add a drop shadow H3 V -3, opacity 36, blur 6.
Copy merged and paste the second tag we mage as a new layer, position to the side the duplicate & mirror
So it should now look like the screen shot below

Select the rectangle tool, set the background colour to black the foreground to null and draw out a rectangle as directed below

Right click on the layer in the layer palette, convert to raster layer.
Go to selections, float, selections defloat then selections again, modify contact by 10.
add a new layer, flood fill with the colour you used on the smaller frames background, apply the Xero Fritillary as before, selections, select none, right click on this layer, merge, merge down, drag this layer to the bottom
Add your name. I used bank Gothic, black but changed the kerning to 350. Add copyright info. You are Done!
Proud member of Tutorial Writers Inc
Tutorial written by © Mythical
all rights reserved
No comments:
Post a Comment