

For this tutorial you will need:
Tube or tubes of choice, I am using the art of Toosh Toosh,
the tubes I am using are free, BUT you still need a licence, you can get it here
Filter used VanDerLee Snowflakes
1.
Open a blank canvas 550 x 200
Go to selections, Select all
Copy the picture and paste into selection, using the deform tool tool to stretch to fit the canvas if needed,
If you are not going to animate move to step 4
2.
Duplicate this layer 3 for a total of 4 layers, Rename the bottom layer bg and hide, rename to remaining layers a, b & c
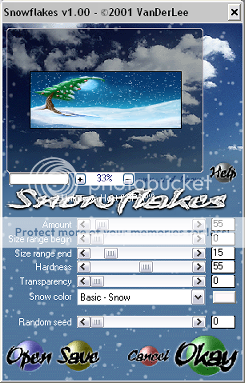
Appy VanDerLee snowflakes to Layers a,b & c with the following setting changing the random seed each time
3.
Hide layers b & c for now
4.
Copy and paste the bear or tube of choice and move to the right side of the canvas, resize as desired.
5.
Copy and paste the candy cane or other element of choice I resized by 15% smart size, resize all layers unchecked.
6.
Copy and paste the reindeer as a new layer and resize by 25% same settings as before.
7.
Go to selections, select all, modify, contract by 5 pixels, selections, invert, Click on each layer except the bg layer and hit delete on your keyboard, unhide the bg layer, make the top layer active, Add a new raster layer then add a drop shadow H&V 1, opacity 100, Blur 2, Colour black, add the same drop shadow again but change the H&V to -2.
8.
Add a new layer flood fill with a colour that compliments the tag, go to selections, select all, modify, contract by 1 pixel then hit delete on your keyboard, go back to selections, select none.
9.
add your name & copyright information,
ANIMATION
10.
Hide the bg, a b & c layers, then go to layers, merge, merge visable
Unhide The bg layer and layer a, go to edit, copy merged, then open Animation Shop(AS), go to edit, paste as new animation.
11.
back to Paint Shop(PS) Hide layer a & unhide layer b, go to edit, copy merged, back to AS, Paste after current frame
12.
back to PS Hide layer b & unhide layer c, go to edit, copy merged, back to AS, Paste after current frame, Go to edit, select all, then animation, frame properties set to 20, view your animation. save
AVATAR
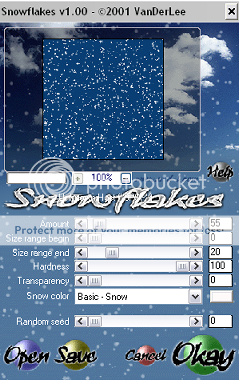
Open a blank canvas 150 x150, flood fill with a colour from your tube, Reapeat step 2 but use the following VanDerLee snowflakes settings
Copy and paste your tube, resize as arrange as desired, select the crop tool and snap crop rectangle to merged opaque,
Repeat steps 7, 8 & 9
Repeat the animation steps 10, 11 & 12,
Your done!
Proud member of Tutorial Writers Inc
Tutorial written by © Mythical
all rights reserved
No comments:
Post a Comment