For this tutorial you will need:
A tube of choice, I am using the art of Martin Abel to use his art
you will need to purchase it from the Creative Designs Outlet here
dbs Flux Bright Noise
Xenofex 1
Font used - Bank Gothic MT BT Medium Here
Open a new canvas 550 x 200Choose a colour to match your tube of choice, flood fill the canvas
Go to effects, texture effects, weave apply the following settings:
Gap size 1, Width 5, Opacity 1, weave colour & Gap colour both black, Fill gaps checked.
Go to effects, texture effects, Blinds, apply the following settings: Width 2, Opacity 35, Colour a darker one from your tube. Both Horizontal & Light from left/top checked.
Copy and paste your tube three times onto your canvas arrange as desired
Hide the bottom layer right click the top layer, merge, merge visible.
Select the crop tool then click snap crop rectangle to merged opaque.
Unhide the bottom layer.
Change the merged layer blend mode to Luminance & change the Opacity of the layer to 30, right click merge, merge down. right click go to rename and rename this layer bg.
Set the background colour to a dark colour from your tube.
Select a dark colour from your tube activate the Pen tool Line style solid, width 8.00, anti-alias checked, draw a line across the Canvas (see my tag for reference)
Select a light colour from your tube, change the line style to Dash Dot Dot, change the line width to 3, place directly one top of the line , right click the layer, merge, merge down,
Duplicate this layer and move the duplicate line about ¾ of the way down the page (see my tag for reference) again right click, merge, merge down, rename this layer Lines.
Make the bottom layer active, select the rectangle selection tool and select the area between the two line, making sure the bottom layer is active, go to image, mirror, add the blinds again but change the width to 3 and the Opacity to 50. selections, select none
Change your background colour to the lighter colour form your tube or white if you prefer, select the font tool, find a font I used Bank Gothic Light, 22, put your caps lock on, type out: “BAD GIRL .” 3 times, add the following drop shadow V&H 1, opacity 60, Blur 3, Color Black. (optional) I also added ATTITUDE beneath the bottom line.
Copy and paste your tube of choice as a new layer, resize if needed, Move to one side of the canvas.
Change the background colour the dark colour from your tube, change the size to 36, type out your name, add the same drop shadow as before
Make you bottom layer active, Go to selection, select all, selections, modify, contract, contract by 6 pixels, back to selections, invert add a new layer, move this layer to the top, set the background colour to a dark colour from your tube & the foreground to a light colour find the foreground-background gradient change the angle to 39, set repeats to 4, invert unchecked, flood fill the layer, go to effects, plugins, DsbFlux, Bright noise, intensity 54, click on lighter, Rename this layer border. Add your copyright information
Activate the bottom layer copy and paste as a new image.
Avatar
Open a blank canvas 150 x 150, copy and paste the bg layer from your banner a new layer, Select the crop tool then click snap crop rectangle to merged opaque.Copy and paste your tube of choice as a new layer, resize if needed and position to your liking
Make you bottom layer active, Go to selection, select all, selections, modify, contract, contract by 4 pixels, back to selections, invert add a new layer, move this layer to the top, Flood fill with the foreground-background gradient used earlier, go to effects, plugins, DsbFlux, Bright noise, intensity 54, click on lighter. Add your name & copyright information.
Animation (Optional)
The signature tag – hide the border, lines & bg layers, go to layers, merge, merge visible. Unhide the layers.
1. Make the lines layer active, go to selections, select all, selections float, selections, de float right click the lines layer click promote selection to layer, repeat 2 more times.
Selections, select none
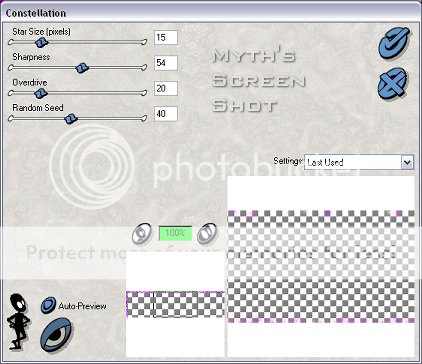
2. Click on the top promoted selection layer, go to effects, plugins, Xenofex 1, constellation, use the following settings.
3. Repeat steps for the middle & bottom promoted layers, but change the random seed to 45 for the middle promoted layer and 50 for the bottom promoted layer.
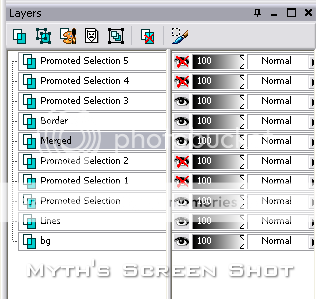
4. Repeat steps 1 to 4 on the border layer. Then hide the top & Middle layers on both the border promoted layers and the lines promoted layers. This is what you should have in your layers palette
5. Go to edit, copy merged, open animation shop go to edit and paste as a new animation.
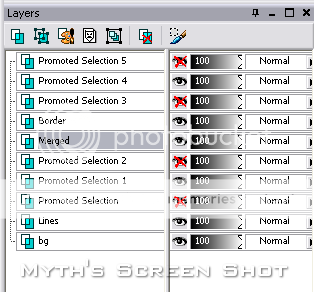
6. Go back to Paint Shop hide the bottom promoted layers and unhide the middle promoted layers as shown in the screen shot,
go to edit, copy merged. Go back to Animation Shop edit, paste after current frame.
7. Repeat step 6 for the top promoted layers. Then in Animation Shop go to edit, select all, then go to Animation, frame properties set the display time to 15, then go back to animation, select animation properties, click Opaque and change the colour to white, save your animation
8. Activate the avatar you made to match repeat steps 4,5,6,&7
Your Done!
Proud member of Tutorial Writers IncTutorial written by © Mythical
all rights reserved

Tuesday, 9 February 2021
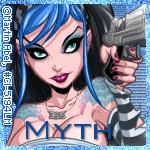
Bad Girl

Subscribe to:
Post Comments (Atom)
No comments:
Post a Comment