
For this tutorial you will need:
A tube of Choice, I am using the work of Elias Chatzoudis,
to use this tube you will need to purchase it from PSP Tubes Emporium here
My Supplies here
Plugin used:
Penta Color dot
VM Extravaganza Ray Transmission
1.
open a blank canvas 600 x 250
Set you foreground & background colours to two very different colours from
your tube, go to the gradient tab, find the background/Foreground Gradient, set
the angle to 45, Repeats 2, flood fill your canvas.
2.
Duplicate this layer, rename the layers 1 & 2, On layer 1, go to Effects,
plugins, VM Extravaganza, Ray Transmission and use the following setting 81,
100, 18, duplicate the layer, go to image, mirror
3.
(Do this step only if you intend to animate) Repeat step 2 with layer 2 but
change the Rays setting to 91, Rename the Ray Transmission layers R1,R2,R3, & R4
4.
Copy and paste the rectangle as a new layer, go to Effects, Plugins, VM
Extravaganza, shoutin'! and use the following settings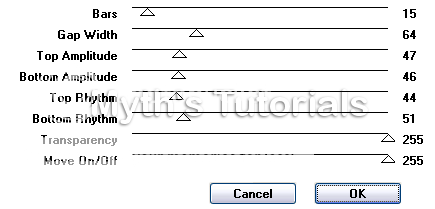
Change the Blend Mode of this layer to Soft Light.
5.
Copy and paste your tube or close ups as a new layer 2 times, arrange to your
liking, right click on the top layer, merge, merge down, change the Bond Mode of this layer to screen.
6.
Add anew raster layer, go to Selection, select all, Copy the texture from the supplies,
Paste into selection, selections, select none, recolour if needed.
7.
Type out what you want for the rectangle, I used Impact, size 16 & put a pixel
heart between the words(pixelheart supplies) Add any other words you wish, go
to edit, copy & paste as new image, minimise(we will use this for the avatar)
8.
Copy and paste your tube as a new layer, resize if needed. Duplicate, go to
Adjust blur Average, set to 11, change the blend mode of this layer to soft light.
9.
active the bottom layer, select all, add a new raster layer, right click,
arrange, send to top, go to Selections, contract by 8, pixels, fill with 1 of
your chosen colours, Selections, select none, back to selections select all,
selections, contract by 6 pixels, fill with the other colour
Go to Effects, plugins, Penta colour dot use the following settings - 90, 2,
255, 255, 255, selections, select none, add new layer, fill with 1st colour, go
to selections, contract by 2 pixels, hit delete on your keyboard.
10.
Add your name & copyright information (If your not animating your done!)
Animation
1.
Hide layers R2, R3 & R4, go to Edit copy merged, Open Animation Shop(AS) Go to
edit & paste as a new animation.
2.
Back to Paint shop(PS) hide layer R1 & unhide layer R2, Edit, copy merged,
Back to AS, edit, paste after current frame.
3. Repeat step 2 with R3 & R4
Your Done!
Avatar
1.
Open a blank canvas 150 x 150, copy and paste the image we minimised earlier
as a new layer, arrange to your liking, select the crop tool, Snap crop
rectangle to: Merged opaque 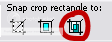
2.
Repeat steps 8, 9 & 10.
3.
Go to Edit, copy merged, over in AS Paste as new animation,
then Paste after current frame
.
4.
Open the HeartAnimation from the supplies in AS
*Note If you need to re colour - then Go to edit, select all, File, Export frames to
Paint Shop Pro, over in PS recolour each heart close image, click no, then yes.
Back to AS Edit select all, On the Avatar Paste into selected frame.
Your Done!
Proud member of Tutorial Writers Inc
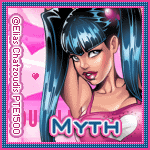
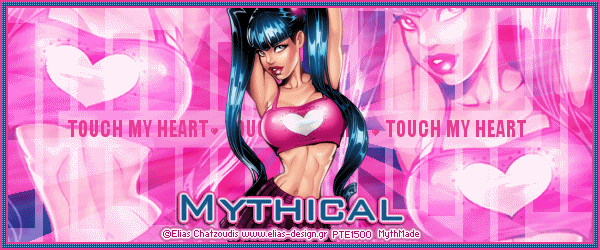
Tutorial written by © Mythical
all rights reserved
No comments:
Post a Comment